Behringer U-Phoria UMC204HD Review: Still worth it in 2026?
- Audio Interface, Reviews
- by Bruno Bontempo
My hands-on Behringer U-Phoria UMC204HD review covers MIDAS preamps, MIDI I/O, and real performance tests. Find out if this budget interface fits your needs.
Our articles may include affiliate links and we may earn a commission. Here how it works.
Jump to...
OUR VERDICT
4.5
The Behringer U-Phoria UMC204HD packs features you’d expect from interfaces twice its cost. The MIDAS-designed preamps deliver clean, detailed recordings for vocals and instruments alike. I was particularly impressed by the MIDI I/O and insert connections—features rarely found at this price point. For home studio musicians, podcasters, and singer-songwriters who need reliable performance without complications, this interface delivers. If you need two solid inputs with room to grow, click below to check the latest availability.
Release Date
Aug 2015
18.5x13x4.6 cm
7.28x5.12x1.81 in
600 g
1.37 lb
| Pros
- MIDAS preamps with enough gain for dynamic mics like the SM7B
- MIDI I/O included—rare at this price point
- Insert jacks for external compressors or EQ
- Solid metal chassis built for travel
- Low-latency performance with stable ASIO drivers
| Cons
- No loopback feature for streaming
- 48V phantom power switch located on back panel
- Single phantom power switch affects both channels
| Key Features
- Inputs: 2 x XLR/TRS combo inputs (mic, line, or instrument), Hi-Z instrument input capability
- Outputs: 2 x 1/4" TRS balanced main outputs, 2 x stereo RCA output pairs (4 outputs total), 1 x 1/4" headphone output
- Compatibility: Windows XP or higher (ASIO drivers available), macOS 10.6.8 or higher (class-compliant, no driver needed)
- Connectivity: USB 2.0 Type-B (bus-powered), 5-pin DIN MIDI In/Out
- Resolution: 24-bit / 192 kHz
-
Plus:
Tracktion DAW, 150 instrument/effect plug-ins downloadable, zero-latency direct monitoring with Mix knob, monitor A/B switching for comparing speaker setups, +48V phantom power for condenser microphones, standalone operation possible with external USB power
| Best for...
- Home studio musicians recording vocals and instruments
- Singer-songwriters tracking guitar and voice simultaneously
- Podcasters who want clean audio without complexity
- MIDI keyboard users needing hardware connectivity
- Budget-conscious creators stepping up from basic interfaces
| Not ideal for...
- Streamers who need built-in loopback functionality
- Multi-mic podcast setups requiring more than 2 inputs
- Users who need independent phantom power per channel
Behringer U-Phoria UMC204HD Overview: What This Interface Actually Offers
Behringer has come a long way since the days when their gear was dismissed by serious musicians. The U-Phoria UMC204HD represents a turning point for the company—a USB audio interface that competes directly with products at twice its cost.
The UMC204HD sits in the sweet spot for home recording. It gives you two channels with MIDAS-designed preamps, four outputs, MIDI connectivity, and insert jacks for external processing. That’s a lot of capability packed into a compact, bus-powered unit.
Behringer partnered with MIDAS—a British company known for professional live sound consoles—to design the preamps in this interface. The result is noticeably better than the old Xenyx preamps that gave Behringer a mixed reputation. These preamps are quiet, clean, and have enough gain to drive demanding microphones without a separate booster.
The target user here is clear: you’re a musician working at home, a podcaster who wants quality without fuss, or a content creator who needs reliable audio. You might be recording guitar and vocals at the same time, or connecting a MIDI keyboard to your DAW. In other words, the UMC204HD is built for people who create, not for people who want to spend hours configuring gear.
What stands out about this interface is how much Behringer included. Most budget interfaces skip MIDI ports to cut costs. Most skip insert jacks entirely. The UMC204HD gives you both, plus multiple output options that let you connect studio monitors, reference speakers, and headphones all at once.
In the following sections, I’ll break down each feature, explain what it actually means for your recordings, and share what I found during testing.
UMC204HD Features Explained: What Each Spec Means for Your Music
Add Your Tooltip Text Here
Before diving into technical details, let me be clear: specs on paper don’t always translate to real-world performance. Therefore, I’ll explain what each feature does and why it matters for your recordings.
MIDAS-Designed Preamps
The preamps are the first thing your microphone signal touches, so their quality affects everything downstream. MIDAS has built mixing consoles for major touring acts since the 1970s, and Behringer brought that expertise to this interface.
- What It Means for You: Think of preamps like the first link in a chain—if that link is weak, everything after suffers. The MIDAS preamps amplify your mic signal without adding noise or color you didn’t ask for. I tested them with a Shure SM58 and an Audio-Technica condenser, and both sounded natural and detailed. The preamps stay usable even at 85-90% gain, which is impressive for this price range.
24-bit/192kHz Resolution
This spec describes how much audio information the interface captures. The 24-bit depth gives you more dynamic range (quiet to loud), while 192kHz is the maximum sample rate.
- What It Means for You: Higher resolution means more detail in your recordings. However, most professional work happens at 44.1kHz or 48kHz. The extra headroom at 24-bit is genuinely useful—it gives you more room to edit without hearing noise. Think of it as shooting photos in RAW instead of JPEG: you have more flexibility in post-production.
Combo XLR/TRS Inputs
Each input accepts XLR cables (for microphones) or 1/4″ cables (for instruments and line-level gear). A switch lets you choose between line-level and instrument-level impedance.
- What It Means for You: You can plug in a microphone, guitar, keyboard, or any line-level source without adapters or additional boxes. The Line/Inst switch optimizes the input for each type of signal. When recording guitar directly, engage the Inst setting; for keyboards or external preamps, use Line.
Insert Jacks
These jacks let you add external hardware processors—like compressors or EQ—into the signal path before the audio reaches your computer.
- What It Means for You: If you own an analog compressor or want to use vintage gear during recording, the inserts make it possible. You’ll need an insert cable (TRS to dual TS), but the option is there. This feature usually appears on interfaces costing much more.
MIDI In/Out
Standard 5-pin DIN MIDI ports connect keyboards, drum machines, and controllers to your computer through the interface.
- What It Means for You: If your MIDI keyboard only has traditional MIDI ports (not USB), this interface handles it. Similarly, this keeps your laptop’s USB ports free for other devices. For musicians with older hardware synths or specific controllers, this alone might justify the purchase.
Zero-Latency Direct Monitoring
A Mix knob blends your input signal with playback from your computer, letting you hear yourself without delay.
- What It Means for You: Latency—the delay between playing and hearing yourself—can ruin a performance. The direct monitoring feature bypasses your computer entirely for monitoring, so you hear yourself in real time. The Mix knob lets you balance how much of your live input versus your DAW playback you want in your headphones.
Monitor A/B Switching
A button on the front panel switches between two sets of RCA outputs, letting you compare your mix on different speakers.
- What It Means for You: Professional engineers check their mixes on multiple speaker systems. The A/B switch lets you quickly flip between your main monitors and, say, a pair of consumer speakers—without unplugging anything. This helps you ensure your mix sounds good everywhere.
-20dB PAD Switch
Each input has a pad that reduces the incoming signal level by 20 decibels.
- What It Means for You: Some sources are simply too loud—a screaming vocalist, a drummer hitting hard, or a keyboard with high output. The pad prevents these signals from clipping at the preamp stage. It’s a safety net that gives you more control over hot sources.
Specs Table
The Behringer U-Phoria UMC204HD delivers features typically found in interfaces at twice the cost. Check out the specs below, then click the link to see current availability and start recording.
| Feature | Specification | Practical Benefit |
|---|---|---|
| Simultaneous I/O | 2 inputs / 4 outputs | Record vocals and guitar at the same time while monitoring through multiple speaker systems |
| Inputs | 2 x XLR/TRS combo (mic, line, Hi-Z instrument) | Connect any microphone, keyboard, or guitar without adapters—one input handles it all |
| Outputs | 2 x 1/4" TRS balanced + 2 x stereo RCA pairs + 1 x headphone | Run studio monitors, reference speakers, and headphones simultaneously for better mix decisions |
| Compatibility | Windows XP+, macOS 10.6.8+, Linux, iOS (with powered hub) | Works on virtually any computer—Mac users get plug-and-play without driver installation |
| Connectivity | USB 2.0 Type-B (bus-powered) | Single cable for power and data—no wall adapter needed for portable recording |
| Resolution | 24-bit / 192 kHz | Captures more detail than CD quality, giving you flexibility to edit without hearing noise |
| Phantom Power | +48V (single switch for both channels) | Use condenser microphones without external power supplies |
| Direct Monitor | Zero-latency with Mix knob control | Hear yourself in real time while recording—no distracting delay in your headphones |
| Bus Powered | Yes (USB) | Grab your laptop and interface for mobile recording without hunting for power outlets |
| MIDI I/O | 5-pin DIN In/Out | Connect keyboards, drum machines, and controllers without using extra USB ports |
| Insert Jacks | 2 x 1/4" TRS | Add hardware compressors or EQ during recording—a feature rarely found at this price |
| PAD Switch | -20dB per channel | Handle loud sources like close-miked drums without clipping the preamp |
| Preamp Gain | Up to +60dB | Enough gain for demanding dynamic mics like the SM7B without a separate booster |
| Dynamic Range | 110dB (claimed) | Captures quiet details and loud peaks without distortion or audible noise floor |
| Software Included | Tracktion DAW + 150 plugins | Start recording immediately without buying additional software |
| Build | Metal chassis with aluminum shell | Survives being tossed in a backpack for mobile sessions and gigs |
UMC204HD Performance: How It Actually Sounds and Responds
Numbers tell part of the story, but what really matters is how the UMC204HD performs when you hit record. I put it through various scenarios to see where it excels and where it shows its budget origins.
Preamp Performance: The MIDAS preamps genuinely impressed me. Recording vocals with a condenser mic, the sound came through clear and detailed. There was no need for a Cloudlifter or FetHead with a Shure SM58—the gain was sufficient even for dynamic mics with lower output.
At higher gain settings (above 60%), some noise becomes audible if you’re boosting very quiet sources. However, for typical vocal and instrument recording distances, this isn’t an issue. The preamps remain usable up to about 85-90% before noise becomes distracting.
Latency Results: Latency numbers depend heavily on your computer, drivers, and buffer settings. In my testing on a Mac, the interface performed as a class-compliant device without driver installation. Round-trip latency measured around 7-8ms at 44.1kHz with optimized buffer settings—competitive with interfaces costing more.
On Windows, installing the dedicated ASIO drivers is essential. With proper setup, users report stable performance with low latency. Some forum discussions mention occasional driver quirks, but the majority of users find the Windows drivers reliable.
Converter Quality: The Cirrus Logic CS4272 converters handle the analog-to-digital and digital-to-analog conversion. These same chips appeared in earlier Focusrite Saffire interfaces, which had solid reputations.
Playback through the headphone output revealed good detail and clarity. I tested with Sennheiser HD650 headphones (300 ohms) and Beyerdynamic DT250s (80 ohms)—both sounded detailed and balanced. Lower-impedance earbuds didn’t perform as well, so pair this interface with proper studio headphones for best results.
Recording Quality: The overall recording quality is clean and transparent. Vocals came through natural, acoustic guitar captured with appropriate warmth, and direct guitar into amp simulators worked without issues. The high maximum input level (+20 dBu) means loud sources don’t cause problems.
For the intended use cases—home recording, podcast production, and demo creation—the audio quality is more than adequate. You could release music recorded through this interface without anyone knowing you used a budget unit.
UMC204HD Design and Usability: Living With This Interface Daily
The technical specs got me interested, but the day-to-day experience determines whether gear becomes a trusted tool or a frustration. Here’s what using the UMC204HD actually feels like.
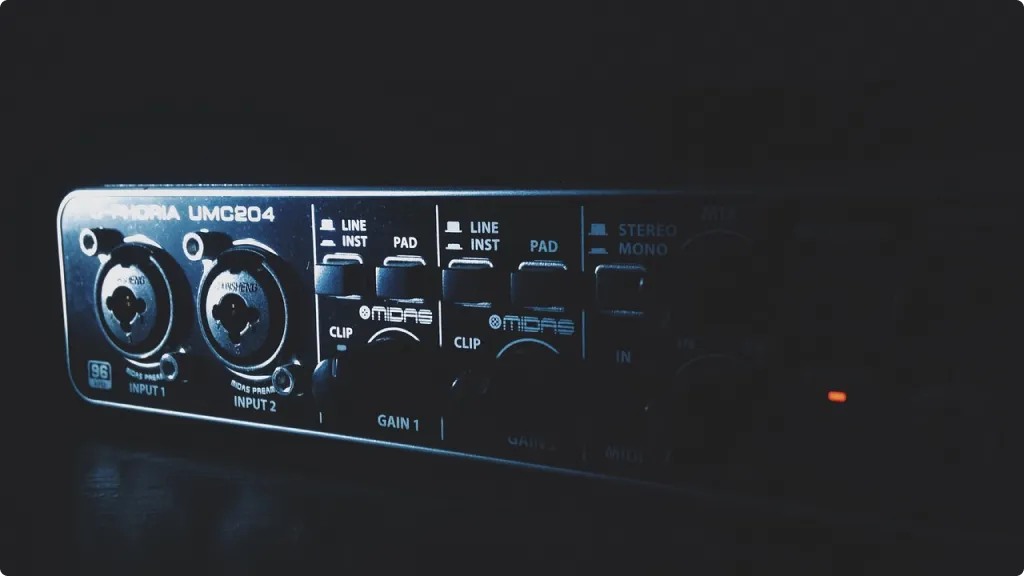
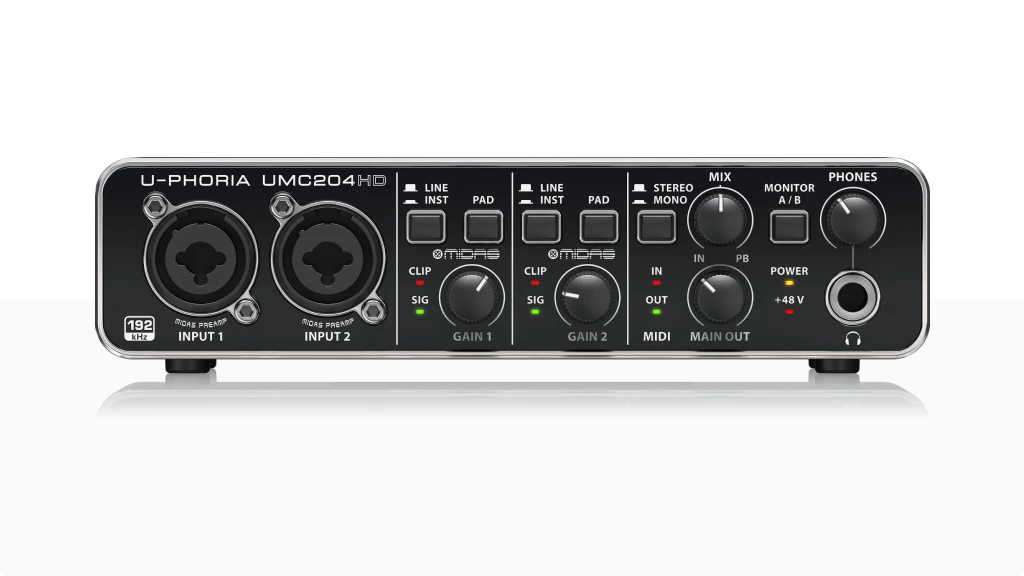
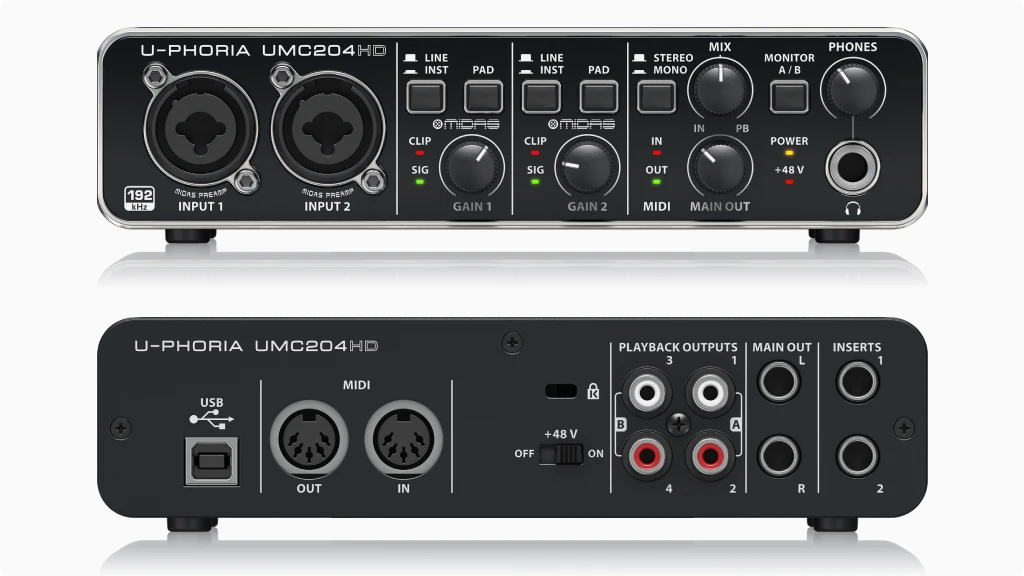
Front Panel
The front panel layout is logical and accessible. The two combo inputs sit on the left, each with its own gain knob, Line/Inst switch, and PAD button. Signal and clip LEDs provide visual feedback—green means signal present, red means you’re clipping.
Moving right, you find the Mix knob for direct monitoring blend, the Monitor A/B button, and a Mono/Stereo switch for headphone monitoring. The headphone jack sits next to its dedicated volume knob, and the main output volume completes the layout.
Everything you need during recording is within reach. The knobs feel solid despite being plastic, and the layout makes sense even for beginners.
Back Panel
The back panel is busier. The USB-B port connects to your computer, and since the unit is bus-powered, that’s your only power connection needed.
The main outputs are 1/4″ TRS balanced jacks. Two pairs of RCA outputs give you the four total outputs—switchable via the front panel A/B button. The insert jacks (RCA format) sit nearby.
MIDI In and Out use standard 5-pin DIN connectors. Finally, there’s the 48V phantom power switch, which is small and tucked away. A Kensington lock slot provides security if needed.
Having the phantom power switch on the back isn’t ideal—you have to reach around to toggle it. However, the front panel LED confirms when it’s active, so at least you can verify the status without crawling behind your desk.
Setup Experience
Getting started is straightforward. On Mac, it’s truly plug-and-play—connect the USB cable, and the system recognizes the interface immediately. Select it as your audio input/output in system preferences and your DAW, and you’re recording.
Windows requires a driver download from Behringer’s website. Installation is standard, and the ASIO control panel lets you adjust buffer sizes. Most users complete setup within ten minutes.
The bundled Tracktion software provides a complete DAW for those just starting out, though experienced users will stick with their preferred software. The interface works with Ableton, Logic, Pro Tools, Reaper, and every other major DAW I tested.
One minor annoyance: on some systems, the interface can produce a pop when first connected if your monitors are already on. Turn your monitors down or off before connecting the USB cable to avoid this.
Getting the Most From Your UMC204HD: Practical Tips for Better Recordings
Beyond the standard feature rundown, I want to share some insights that will help you maximize what this interface offers. These tips come from actual use and address common questions I’ve seen from users.
Using the Insert Jacks Effectively: The insert jacks are one of the UMC204HD’s hidden strengths. They let you add hardware processing during recording—something most budget interfaces can’t do.
To use them, you need an insert cable: one end has a TRS (tip-ring-sleeve) plug, the other end splits into two TS (tip-sleeve) plugs. The tip carries the send (output to your compressor), and the ring carries the return (input back from your compressor).
A practical application: connect a hardware compressor to tame vocal dynamics while recording. This prints the compression to your track, giving you a more controlled signal from the start. Just remember that printed effects can’t be undone, so use gentle settings.
Optimizing Latency on Windows: Windows users sometimes struggle with latency. Here’s how to get the best performance:
First, download and install the official ASIO driver from Behringer’s website. Don’t rely on generic Windows drivers.
In the ASIO control panel, start with a buffer size around 256 samples and adjust based on your system. Lower buffers mean less latency but more CPU load. Find the balance where you get smooth playback without crackles.
Disable unnecessary background processes. Close browsers, streaming apps, and anything competing for CPU resources during recording.
If you still experience issues, try connecting to a USB 2.0 port directly on your computer rather than a hub.
Setting Gain Levels Properly: The signal/clip LEDs help, but here’s a better approach.
With your input source active, adjust the gain until the signal LED flickers consistently during the loudest parts. You want to see it light up without ever hitting the red clip indicator.
Leave some headroom—you don’t need to maximize the signal. Recording at moderate levels and boosting later in your DAW is better than clipping during the original take.
For loud sources that still clip even with the gain low, engage the -20dB PAD. This is especially useful for close-miked drums or high-output keyboards.
Using Both Output Pairs: The A/B monitor switching isn’t just a gimmick—it’s genuinely useful for mixing.
Connect your primary studio monitors to the main TRS outputs. Then connect a second pair of speakers (or even a consumer stereo system) to one of the RCA pairs.
During mixing, use the A/B button to quickly compare how your mix sounds on different systems. If your mix only sounds good on your main monitors, it probably needs adjustment.
Standalone Operation: Here’s something not everyone knows: the UMC204HD can work without a computer if you power it from a USB wall adapter.
In this mode, you can use the preamps and phantom power with an external recorder. You could also use it as a simple mixer for live situations, running your mic through the interface into an amp or PA.
This makes the UMC204HD more versatile than a typical computer-only interface.
Final Thoughts: Is the Behringer U-Phoria UMC204HD Right for You?
The Behringer U-Phoria UMC204HD does something difficult: it delivers genuine value without cutting corners where it counts. The MIDAS preamps aren’t marketing hype—they actually sound clean and capable. The MIDI ports aren’t just checkbox features—they work reliably for hardware connectivity. The insert jacks aren’t throwaway additions—they expand what you can do with analog gear.
After putting this interface through its paces, I can confidently say it punches above its weight. The recordings are clean, the latency is manageable, and the build quality suggests it will last through years of use.
That said, it’s not perfect for everyone. Streamers will miss the loopback feature. Podcast teams will outgrow the two-input limit. And if you need independent phantom power for each channel, look elsewhere.
But for the musician recording at home, the podcaster starting out, or the content creator who needs reliable audio without complications—the UMC204HD delivers. It’s the kind of gear you can grow with, not grow out of immediately.
The features that set it apart—MIDI I/O, insert jacks, A/B monitoring, and four total outputs—are genuinely useful, not just spec-sheet padding. Behringer understood that budget-conscious buyers still want versatility.
If your needs align with what this interface offers, you’ll likely be satisfied. It won’t transform your recordings magically, but it will capture your sound faithfully and give you tools that make the recording process smoother.
For home studios, bedroom producers, and solo creators, the Behringer U-Phoria UMC204HD remains one of the smartest choices in its category. The combination of MIDAS preamps, thoughtful features, and solid build quality creates genuine value. And in the end, that’s what matters most when you’re ready to hit record.
8. FAQ
Can I use the Behringer UMC204HD with an iPad or iPhone?
Yes, but you’ll need a powered USB hub and Apple’s Camera Connection Kit (Lightning to USB adapter). The UMC204HD draws too much power for an iPad to supply directly. Connect the interface to a powered hub, then connect the hub to your iOS device through the Camera Connection Kit. Some users report needing to adjust the iPad’s volume after connecting to get audio output. The interface works with GarageBand, Cubasis, and other iOS recording apps once properly connected.
Why can't I control the UMC204HD volume with the Windows volume slider?
This is expected behavior, not a bug. When using ASIO drivers (required for low-latency recording), the Windows system volume has no effect on the interface output. You must control volume using the physical knob on the front panel of the UMC204HD. This is standard for professional audio interfaces because ASIO bypasses the Windows audio mixer entirely to achieve lower latency. If you need Windows volume control for casual listening, you can switch to the WDM driver in your audio settings, but latency will increase.
Does the UMC204HD work with video conferencing apps like Zoom, Teams, or Discord?
Yes, but with a limitation. These apps typically only recognize Input 1 as the audio source. If you connect a microphone to Input 2, the signal won’t reach your conferencing app. For video calls and streaming, always use Input 1 for your microphone. Additionally, the UMC204HD lacks a loopback feature, so you cannot easily mix computer audio with your microphone input for streaming purposes. If loopback is essential for your workflow, consider using virtual audio cable software as a workaround or choosing an interface with built-in loopback functionality.
| Why Can You Trust Us

Bruno Bontempo
I've been recording, producing, and playing bass for over 20 years—from touring with my first band at 15 to playing progressive metal across Europe today. Through multiple albums, projects (Madness of Light, Rising Course, Roots of Ascendant, Human|Archive), and production work, I've tested audio interfaces in every scenario imaginable. At Best Audio Hub, I combine my historian background with years of hands-on music and audio experience. No marketing fluff—just honest insights from someone who's been in the trenches.
| ALSO REVIEWED