Para Que Serve Interface de Áudio? Guia Completo para Iniciantes
- Guias e Tutoriais, Interface de Áudio
- by Bruno Bontempo
Descubra para que serve uma interface de áudio e como ela transforma suas gravações. Entenda sobre phantom power, monitoramento direto e como resolver latência e chiados.
Our articles may include affiliate links and we may earn a commission. Here how it works.
Jump to...
Introdução
Se você já tentou gravar música, começar um podcast ou fazer streaming com uma qualidade de som decente, provavelmente esbarrou nessa dúvida: eu preciso de uma interface de áudio? E logo em seguida: afinal, o que é isso?
Lembro de me perguntar a mesma coisa quando comecei a gravar minha banda anos atrás. A gente tinha microfones, guitarras e um computador, mas as gravações soavam magras, com ruído e frustrantes. A peça que faltava era a interface. Entender para que serve interface de áudio mudou tudo na minha forma de gravar.
Neste guia, vou explicar o que é esse equipamento, por que ele é importante e como usar sem se perder no “tecnês”. Se você grava voz, guitarra, podcasts ou lives, vai sair daqui sabendo exatamente do que precisa.
O Que É e Para Que Serve Interface de Áudio? A Explicação Simples
Uma interface de áudio funciona como um tradutor entre seus microfones, instrumentos e o computador.
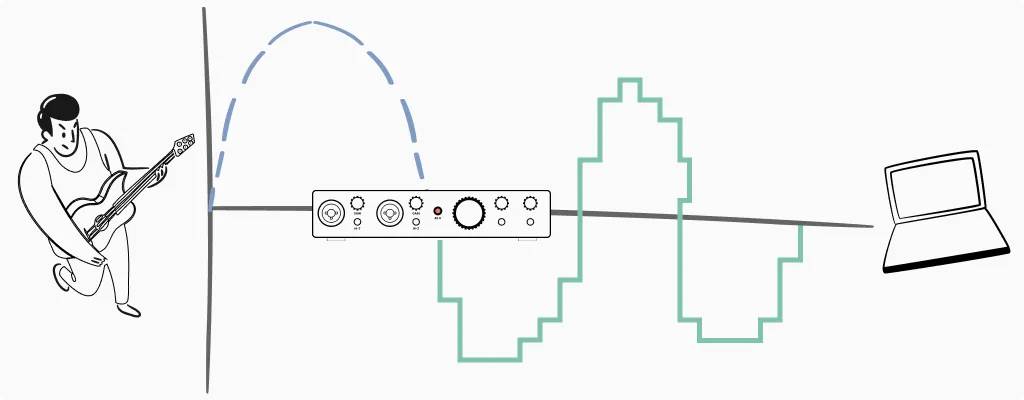
Sua guitarra, baixo ou bateria produzem um sinal elétrico analógico. Seu microfone condensador faz a mesma coisa. Por outro lado, o computador só entende informação digital, uns e zeros. Alguém precisa converter esse sinal analógico em dados digitais que seu software de gravação consiga ler.
É exatamente para isso que serve uma interface de áudio. Ela pega o sinal analógico do microfone ou instrumento, converte para digital (através de algo chamado Conversor Analógico-para-Digital, ou ADC) e envia para o computador.

Posteriormente, quando você dá o play na sua gravação, a interface faz o inverso. Ela converte o áudio digital de volta para analógico para que você possa ouvir nos fones ou monitores.
Pense nela como um intérprete numa reunião. Sua guitarra fala “voltagem”. Seu computador fala “código binário”. A interface traduz nas duas direções para que eles se entendam.
Não Posso Apenas Usar um Microfone USB?
Pode. Microfones USB possuem interfaces de áudio embutidas, ou seja, eles resolvem a conversão internamente. Para chamadas de vídeo, gravações de voz simples ou conteúdo casual, eles funcionam bem.
No entanto, microfones USB têm limitações. Você fica preso a um único microfone com a qualidade do pré-amplificador que já vem nele. Não dá para trocar de microfone facilmente ou usar modelos XLR profissionais. Além disso, se você quiser gravar guitarra ou baixo diretamente, um mic USB não vai ajudar em nada.
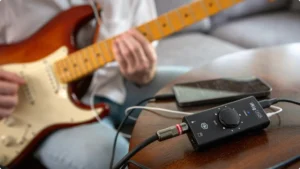
Uma interface dedicada, mesmo uma opção de entrada como a Focusrite Scarlett Solo, te dá flexibilidade. Consequentemente, você pode conectar microfones diferentes, plugar instrumentos direto e melhorar componentes individuais com o tempo. Para quem quer levar a gravação de música a sério, é o melhor investimento a longo prazo.
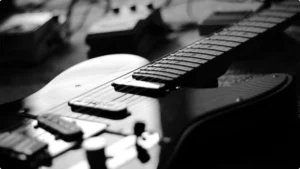
Anatomia de uma Interface de Áudio O Que São Aquelas Entradas
Ao olhar para qualquer interface de áudio, você vai ver uma coleção de entradas, saídas, botões e chaves. De fato, isso pode parecer intimidante no começo, mas cada elemento tem um propósito específico para o seu som.
Vou te guiar e explicar exatamente o que você vai encontrar pela frente ao usar seu equipamento.
Entradas Por Onde o Som Entra
Entradas XLR são aqueles conectores circulares de três pinos. Elas são desenhadas especificamente para microfones, principalmente os modelos condensadores e dinâmicos que usam cabos XLR padrão. Quase todos os microfones profissionais usam conexões XLR porque elas fornecem áudio balanceado, o que reduz ruídos em cabos longos.
Entradas P10 parecem conectores de fone de ouvido grandes. Elas aceitam instrumentos como guitarras, baixos e teclados. Algumas interfaces possuem entradas dedicadas para isso, enquanto outras usam os chamados combo jacks.
Os Combo Jacks são a solução inteligente que a maioria das interfaces modernas utiliza. São aquelas entradas que parecem um círculo dentro de outro, ou seja, um conector XLR com uma entrada P10 no centro. Se você plugar um cabo de microfone, ele conecta na parte XLR. Se plugar um cabo de instrumento, ele conecta no P10. Em resumo, é uma entrada com dois propósitos.
O Botão Hi-Z Chave de Instrumento
Perto de algumas entradas P10, você vai encontrar um botão rotulado como Hi-Z, Inst ou com o desenho de uma guitarra. Essa chave muda a impedância da entrada para receber corretamente os sinais de guitarras e baixos elétricos.
Aqui vai a regra de ouro. Se você estiver ligando uma guitarra ou baixo direto na interface, sem passar por pedais ou amplificadores, ative o botão Hi-Z. No entanto, se você estiver conectando um teclado, sintetizador ou a saída de uma pedaleira, deixe desligado.
Por que isso importa? Guitarras possuem saídas de alta impedância. Se você ligá-las em uma entrada de baixa impedância, vai perder as frequências graves e o som ficará magro e fraco. O botão Hi-Z ajusta a impedância corretamente e preserva o tom encorpado do seu instrumento.
Botões de Ganho O Controlador de Volume
O botão de ganho controla o quanto a interface amplifica seu sinal de entrada antes de convertê-lo para digital. Esse é um dos controles mais importantes da sua interface e acertar isso faz uma diferença enorme nas suas gravações.
Se você ajustar o ganho muito baixo, seu sinal ficará quieto e com muito chiado de fundo. Por outro lado, se ajustar muito alto, o sinal clipa. Isso gera uma distorção digital horrível que soa áspera e não pode ser consertada na edição.
A maioria das interfaces tem algum indicador de nível perto do botão de ganho. Verde significa que seu sinal está saudável. Amarelo indica que você está chegando perto do limite. Vermelho significa que está clipando e você precisa abaixar o volume imediatamente.
Uma abordagem prática é pedir para o músico tocar ou cantar no volume máximo e ajustar o ganho para que o medidor fique no verde ou toque levemente no amarelo. Isso deixa uma margem de segurança para momentos altos inesperados.
Como Ajustar Seus Níveis: A Técnica de Checagem
Saber para que serve interface de áudio e seus botões é uma coisa, mas ajustar corretamente é outra. Aqui está a técnica prática que eu uso sempre que gravo.
O erro que a maioria dos iniciantes comete é falar som, som baixinho no microfone, ajustar o ganho e depois começar a cantar com força total, o que faz o áudio distorcer na hora. O teste quieto foi inútil.
O procedimento correto é performar a parte mais alta da sua música ou fala antes de gravar. Se você é cantor, solte a voz no refrão. Se é guitarrista, toque a parte mais agressiva. Se faz podcast, fale com o entusiasmo que usaria numa história empolgante. Esse é seu ponto de referência.
O alvo é simples. Enquanto performa com intensidade total, olhe o medidor. Você quer os picos entre -12dB e -6dB. Na maioria das interfaces, isso significa luzes verdes ativas com amarelos ocasionais. Você nunca deve ver a luz vermelha nos momentos mais altos.
Esqueça o mito de que precisa gravar o mais alto possível. Isso era verdade na época da fita analógica para reduzir chiado. A gravação digital não funciona assim. Um sinal gravado em -12dB tem basicamente a mesma qualidade de um gravado em -1dB, você só aumenta o volume depois no computador sem prejuízo nenhum.
O conceito chave é o Headroom. Headroom é a margem de segurança entre seus picos e o ponto de distorção. Deixar essa folga significa que momentos altos inesperados não vão estragar seu take. Lembre-se que você sempre pode aumentar uma gravação limpa e baixa, mas nunca pode consertar uma gravação distorcida.
Saídas Por Onde o Som Sai
Saídas de Monitor, geralmente na parte de trás, conectam seus monitores de estúdio ou caixas de som. O botão de volume principal da sua interface controla o nível delas.
Saídas de Fone de Ouvido, geralmente na frente, permitem que você monitore sua gravação de forma privada. Elas possuem seu próprio controle de volume, separado da saída dos monitores.
Isso é muito útil quando você precisa de volumes diferentes para fones e caixas. Além disso, quando for gravar vocais com microfone, você não pode ter som saindo das caixas, senão o som volta para o microfone e causa microfonia. Você precisa de fones nessas horas. Ter saídas e controles independentes permite que você alterne entre esses métodos facilmente.
Cabos e Conexoes O Guia Completo
Já vi muita confusão com cabos atrapalhar quem está começando. Você compra o equipamento, pega um cabo de guitarra, liga na saída de monitores e estranha o som.
Outro cenário comum é ver USB C na caixa mas perceber que seu computador só tem portas USB A. Vou esclarecer isso para você não passar aperto. Entender as conexões é parte fundamental para compreender para que serve interface de áudio na prática e evitar dores de cabeça.

Conexões de Computador USB e Thunderbolt
Antes de falar sobre cabos de áudio, precisamos cobrir como sua interface se conecta ao computador. Isso determina a velocidade, a latência e a compatibilidade do seu sistema.
O USB 2.0 ainda é muito comum em interfaces de entrada. Ele usa aquele conector retangular USB A que você conhece há anos. Apesar de ser considerado antigo, o USB 2.0 lida com gravação e reprodução estéreo sem problemas. Para uma interface simples de dois canais, ele é perfeitamente adequado.
Já o USB 3.0 e suas versões superiores oferecem significativamente mais largura de banda. Você encontrará essa tecnologia em interfaces com muitos canais ou altas taxas de amostragem. Geralmente, as portas USB 3.0 são azuis por dentro para diferenciar das versões antigas.
USB A vs USB B vs USB C
Essa sopa de letras se refere ao formato físico do conector, e não necessariamente à velocidade.
O USB A é aquele plugue retangular chato que fica no seu computador. O USB B é o plugue meio quadrado que conecta em impressoras, interfaces mais antigas e alguns equipamentos MIDI. O USB C é o conector oval, pequeno e reversível encontrado em laptops e interfaces mais novas.
Muitas interfaces modernas usam USB C no aparelho. Por exemplo, a série Focusrite Scarlett 4th Gen já adotou esse padrão. No entanto, elas costumam vir com cabos adaptadores para funcionar em computadores mais antigos.
Thunderbolt
O Thunderbolt é a conexão de alta velocidade da Apple, agora adotada de forma mais ampla. Ela oferece latência drasticamente menor que o USB porque fornece um caminho mais direto ao processador do seu computador.
As versões Thunderbolt 1 e 2 usam o conector Mini DisplayPort, que é retangular com cantos angulados. Você encontra isso em Macs antigos e algumas interfaces profissionais.
Por outro lado, o Thunderbolt 3 e 4 usam o formato de conector USB C. Aqui mora a confusão. Uma porta Thunderbolt 3 pode aceitar dispositivos USB C. Porém, uma porta USB C comum não consegue rodar dispositivos Thunderbolt, a menos que seja especificamente rotulada. Procure sempre pelo ícone de raio.
Interfaces Thunderbolt, como a linha Universal Audio Apollo ou produtos da RME, oferecem latência baixíssima. Isso importa muito para rodar plugins em tempo real enquanto grava. Contudo, elas exigem portas compatíveis no seu computador.
Qual Conexão Você Precisa
Para a maioria dos home studios, qualquer versão de USB funciona muito bem. O Thunderbolt se torna relevante quando você precisa de muitos canais simultâneos ou processamento ultra rápido. Ou seja, se você não está em um ambiente profissional onde cada milissegundo conta, o USB vai te atender perfeitamente.
Cabos de Audio As Conexoes Analogicas
Agora vamos cobrir os cabos que carregam seu sinal de audio real. Entender isso e crucial para saber para que serve interface de audio e como conectar tudo corretamente.
TS Tip Sleeve: O P10 Desbalanceado
Pegue um cabo P10 e olhe para a ponta dele. Conte quantos aneis pretos, os isolantes, existem entre as partes de metal. Se tiver apenas um anel preto, e um cabo TS.
Cabos TS possuem dois condutores. A ponta carrega o sinal e a malha e o terra. Essa e uma conexao desbalanceada. O cabo padrao da sua guitarra e um TS.
Consequentemente, eles funcionam bem para distancias curtas, ate uns 5 ou 6 metros. Porem, se voce usar cabos muito longos, eles podem captar interferencia e ruido de radio.
TRS Tip Ring Sleeve: O P10 Balanceado
Dois aneis pretos significam TRS. Aqui temos tres condutores. A ponta carrega o sinal positivo, o anel carrega uma copia invertida ou negativa, e a malha e o terra.
Por que isso importa? Cabos balanceados rejeitam interferencia. Qualquer ruido captado ao longo do cabo afeta os dois sinais igualmente.
No final, o equipamento inverte o sinal negativo de volta e o combina com o positivo. O audio original dobra de forca, enquanto o ruido se cancela.
XLR: O Padrao Profissional
Cabos XLR tem tres pinos machos ou tres buracos femeas em um conector circular com uma trava. Assim como o TRS, o XLR e balanceado e oferece os mesmos beneficios de rejeicao de ruido.
O XLR e o padrao universal para microfones. O conector com trava evita desconexoes acidentais durante uma performance. Alem disso, o design balanceado permite cabos de mais de 15 metros sem captar zumbidos.
Algumas interfaces possuem saidas XLR para conectar em caixas ativas. Quando vir um XLR, pense em profissional e confiavel.
RCA Equipamentos de Consumo e DJ
Conectores RCA sao aqueles plugues vermelhos e brancos que voce ve em aparelhos de som domesticos e equipamentos de DJ. Eles sao desbalanceados e tipicamente usados em pares para sinais estereo.
Voce nao vai encontrar RCA na maioria das interfaces de audio, mas algumas unidades focadas em DJ incluem essas entradas. Se precisar conectar um toca discos na sua interface, provavelmente vai precisar de adaptadores RCA para P10.
3.5mm P2: O Mini Jack
E a entrada de fone do seu celular ou notebook. Algumas interfaces portateis usam conexoes de 3.5mm, que chamamos popularmente de P2 aqui no Brasil.
Assim como os jacks maiores, eles vem em versoes TS mono e TRS estereo.
Se sua interface tem uma saida de fone P10 e voce quer usar fones de ouvido comuns com plugue P2, um adaptador simples resolve o problema. Eu sempre tenho varios desses adaptadores espalhados pelo estudio, pois eles somem com facilidade.
Conexões de Áudio Digital
Além dos cabos analógicos, muitas interfaces oferecem conexões digitais. Elas são fundamentais para expandir seu setup ou conectar outros equipamentos digitais sem perder qualidade. Se você quer entender para que serve interface de áudio em estúdios maiores, essa parte é essencial.
ADAT (Óptico e Toslink)
O ADAT utiliza cabos de fibra óptica para transmitir até 8 canais de áudio digital através de um único cabo fino. O conector se parece com um pequeno quadrado e, quando ativo, você verá uma luz vermelha brilhando dentro dele.
Por exemplo, interfaces como a Focusrite Clarett+ 4Pre incluem entradas ADAT. Isso permite que você adicione um pré-amplificador externo de 8 canais. Consequentemente, você expande de 4 para 12 entradas sem precisar comprar uma interface totalmente nova.
Lembre-se que o ADAT é unidirecional. Ou seja, você precisa de cabos separados para entrada e saída. Em taxas de amostragem padrão como 44.1kHz ou 48kHz, você obtém 8 canais. Por outro lado, em taxas mais altas, a contagem de canais cai. Em 96kHz, por exemplo, você terá apenas 4 canais.
S/PDIF (Coaxial ou Óptico)
O S/PDIF carrega 2 canais de áudio digital. A versão coaxial usa conectores estilo RCA com um cabo específico de 75 ohms. Ele parece um cabo RCA comum, mas a impedância do cabo importa para o sinal digital.
Já a versão óptica usa os mesmos conectores Toslink do ADAT, mas transmite apenas sinal estéreo.
Você pode usar o S/PDIF para conectar um pré-amplificador externo que tenha saída digital. Além disso, ele serve para enviar áudio limpo para um amplificador de fone de ouvido dedicado que possua entrada digital.
MIDI Padrão de 5 Pinos
Embora não transmitam som propriamente dito, as conexões MIDI frequentemente aparecem nas interfaces de áudio. Esses conectores redondos de 5 pinos transportam dados de notas, informações de controle e sinais de sincronia entre sintetizadores, baterias eletrônicas e seu computador.
Muitas interfaces modernas incluem entrada e saída MIDI. Isso elimina a necessidade de comprar uma interface MIDI separada para o seu estúdio.
Portanto, se você usa sintetizadores de hardware ou drum machines, esse é um recurso valioso para procurar. Para se aprofundar nesse tópico, confira meu guia sobre a Melhor Interface de Áudio com MIDI.
Phantom Power: The 48V Button Explained
Nearly every audio interface has a button labeled “+48V” or “Phantom Power.” This is one of the features that confuses beginners most, but it’s straightforward once you understand what it does—and which microphones need it.
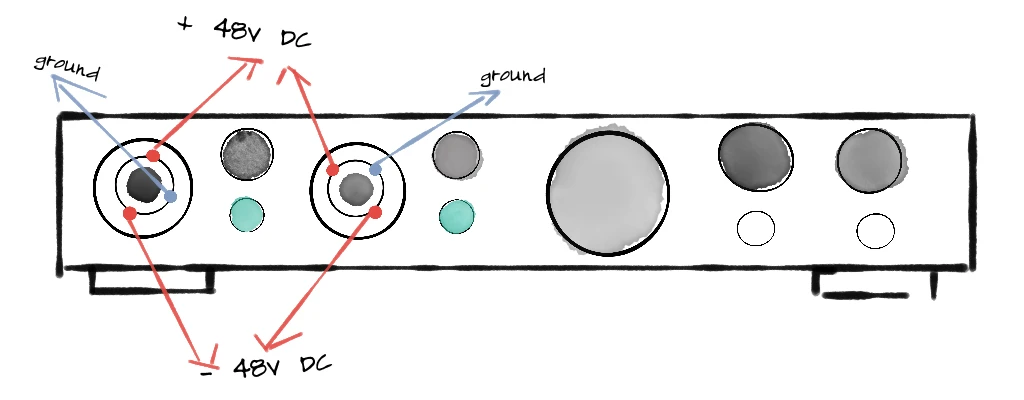
What Phantom Power Actually Does
Phantom power sends 48 volts of DC electricity through the XLR cable to power microphones that need external electricity to operate. The term “phantom” comes from the fact that this power is invisible—it travels along the same wires as your audio signal without interfering with it.
Think of it like gasoline for certain microphones. Without it, they simply won’t produce any signal.
But not all microphones need phantom power. Understanding the three main microphone types helps you know when to use it.
Microphone Types: Which Ones Need Phantom Power?
Condenser Microphones — Always Need Phantom Power
Condenser mics use an electrically charged capsule with two thin plates (a diaphragm and a backplate) separated by a small air gap. Sound waves move the diaphragm, changing the distance between the plates and creating variations in electrical capacitance. This requires power to maintain the charge and amplify the tiny signal.
Condensers are prized for their detail and sensitivity. They capture high frequencies and subtle nuances that other mic types might miss. This makes them popular for vocals, acoustic instruments, and studio recording where you want to capture every detail.
The tradeoff: that same sensitivity picks up room noise, air conditioning hum, and keyboard clicks. Condensers work best in treated, quiet spaces.
Common examples: Audio-Technica AT2020, Rode NT1, Neumann U87, AKG C414.
Large Diaphragm vs. Small Diaphragm Condensers
Large diaphragm condensers (LDCs) have capsules roughly 1 inch or larger. They tend to sound warm and full, with a slight emphasis on low-mid frequencies. Most vocal microphones are large diaphragm condensers.
Small diaphragm condensers (SDCs), sometimes called pencil condensers, have capsules under 1 inch. They respond faster to transients and capture high frequencies more accurately, making them ideal for acoustic guitars, drum overheads, and orchestral recording.
Both types require phantom power.
Dynamic Microphones — No Phantom Power Needed
Dynamic mics work like speakers in reverse. A diaphragm attached to a coil of wire moves within a magnetic field, generating an electrical signal through electromagnetic induction. No external power required—the sound wave itself creates the electricity.
Dynamics are workhorses. They handle high volumes without distortion, reject background noise effectively, and survive being dropped, bumped, and generally abused. This makes them standard equipment for live performance, guitar amplifiers, drums, and broadcast.
The tradeoff: dynamics are less sensitive than condensers. They won’t capture the same level of detail, particularly in high frequencies. For some applications, this is actually an advantage—a dynamic mic on a snare drum naturally tames harsh transients.
Common examples: Shure SM58 (vocals), Shure SM57 (instruments), Sennheiser MD421, Electro-Voice RE20.
What happens if you send phantom power to a dynamic mic? Usually nothing. Most modern dynamic microphones are designed to ignore phantom power safely. However, there’s no benefit to leaving it on, and some vintage or unusual dynamics might not handle it well. Best practice: only enable phantom power when you need it.
Ribbon Microphones — Handle With Care
Ribbon mics use a thin strip of metal (the ribbon) suspended in a magnetic field. Sound waves move the ribbon, generating a signal. They’re known for their smooth, natural sound with a gentle high-frequency roll-off that flatters vocals and tames harsh sources.
Here’s where phantom power becomes critical: passive ribbon microphones can be damaged or destroyed by phantom power. The 48V can magnetize or even burn the delicate ribbon element. If you have a passive ribbon mic, make absolutely certain phantom power is off before connecting it.
Active ribbon microphones are a different story. These have built-in electronics that actually require phantom power to operate, and they’re designed to handle it safely. Always check your ribbon mic’s documentation.
Common passive ribbons: Royer R-121, AEA R84, Coles 4038. Common active ribbons: Royer R-122, AEA A440, sE Electronics Voodoo VR1.
The rule for ribbons: When in doubt, leave phantom power off. Only enable it if you’ve confirmed your specific ribbon mic requires it.
DI Boxes: When Instruments Need Help
A DI box (Direct Injection or Direct Input box) converts unbalanced, high-impedance signals from instruments into balanced, low-impedance signals suitable for microphone inputs. They solve several problems at once.
Why use a DI box?
Your bass guitar or acoustic guitar with a pickup produces a high-impedance, unbalanced signal. Plugging directly into an interface’s instrument input works for short cable runs, but DI boxes offer advantages:
- Balanced output: The DI converts to a balanced signal, allowing long cable runs without noise pickup. Essential for live performance where cables might run 50+ feet to the mixing console.
- Ground lift: Most DI boxes include a ground lift switch that breaks ground loops, eliminating hum and buzz.
- Impedance matching: Proper impedance conversion ensures your instrument’s full tone reaches the recording.
- Thru output: Many DIs include a pass-through jack, letting you send signal to both an amplifier and the interface simultaneously.
Passive vs. Active DI Boxes
Passive DI boxes use a transformer to convert the signal. No power needed. They work well with active instruments (basses and guitars with built-in preamps, keyboards, synthesizers) that output strong signals.
Active DI boxes include electronic circuitry that requires power—either from a battery or phantom power from your interface. They’re better suited for passive instruments (standard electric guitars and basses without active electronics) because they can handle high-impedance sources without signal loss.
Here’s the connection to phantom power: if your active DI box doesn’t have a battery or external power supply, it needs phantom power from your interface to operate. Enable 48V when using an active DI through an XLR input.
Common passive DIs: Radial ProDI, Whirlwind IMP 2. Common active DIs: Radial J48, Countryman Type 85, BSS AR-133.
The Golden Rule for Phantom Power
To avoid loud pops that can damage speakers or headphones (and potentially harm sensitive equipment like passive ribbon mics), follow this sequence:
When connecting: Plug in your microphone first, then turn on phantom power.
When disconnecting: Turn off phantom power first, wait a few seconds for capacitors to discharge, then unplug your microphone.
This habit prevents the sudden voltage surge that causes those alarming pops. It takes three extra seconds and saves you from potential equipment damage.
Direct Monitoring: How to Record Without Delay
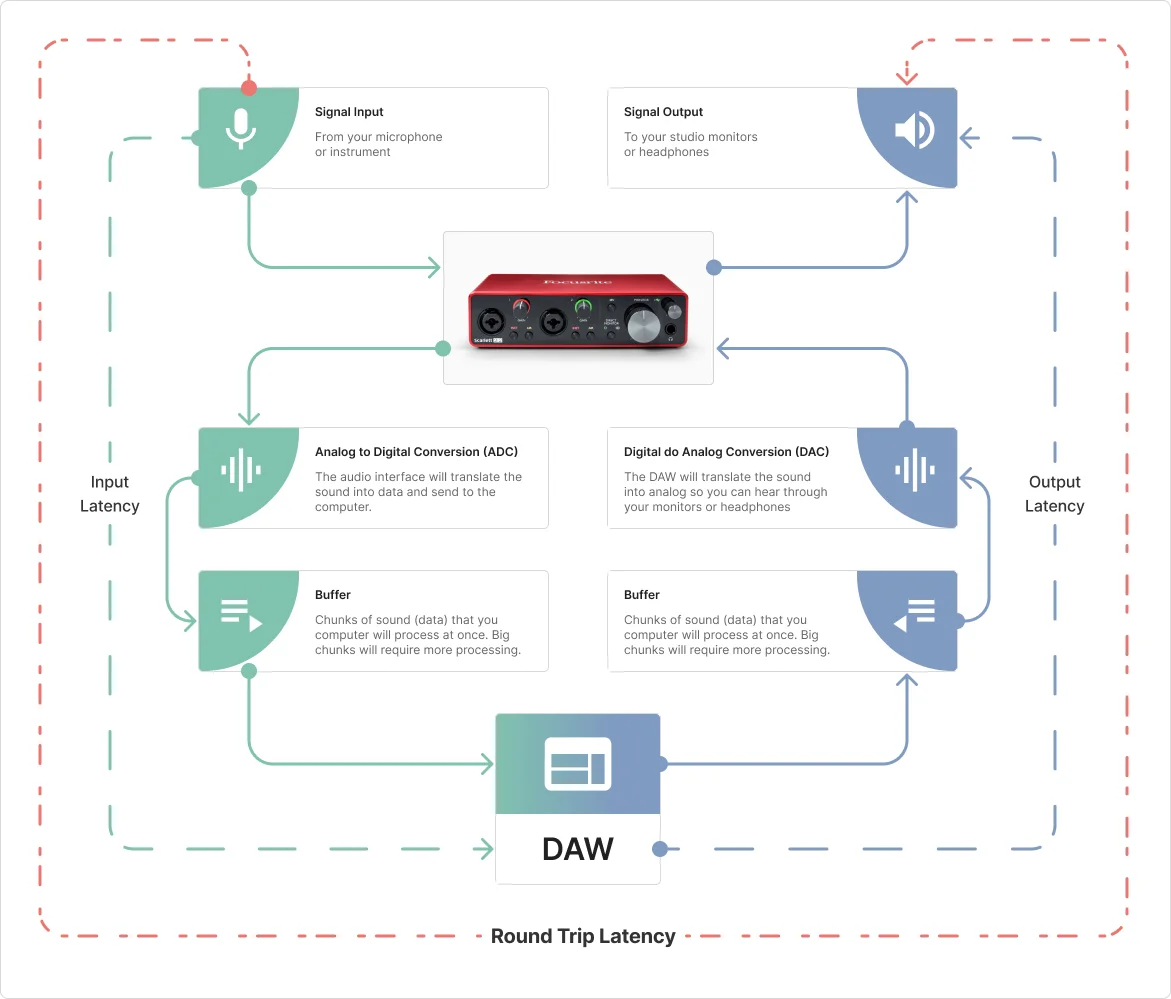
Here’s a scenario every home recording musician encounters: you plug in your microphone, put on headphones, and start recording. But something feels wrong. When you speak or sing, there’s a slight delay before you hear yourself. It’s disorienting, like talking on a bad phone connection.
This delay is called latency, and direct monitoring is the solution.
Why Latency Happens
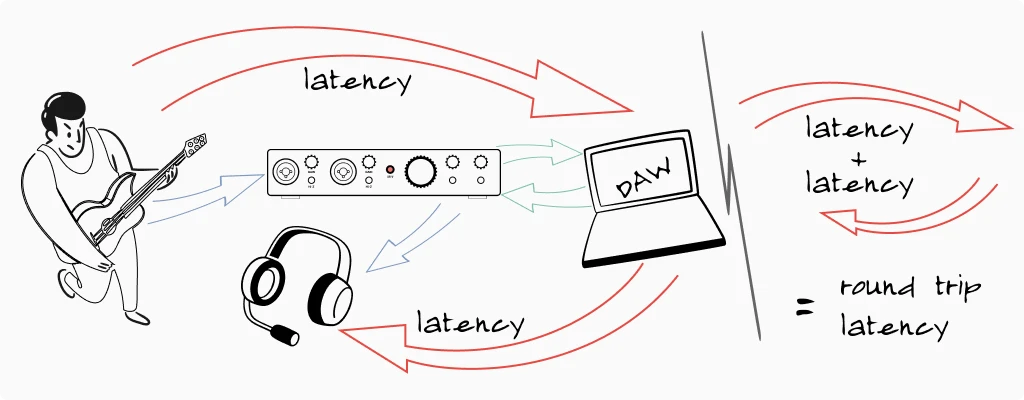
When you record through an audio interface, your signal takes a journey. It goes from your microphone, into the interface, gets converted to digital, travels through a USB cable to your computer, gets processed by your recording software (DAW), travels back through the USB cable, gets converted back to analog, and finally reaches your headphones.
That entire round trip takes time—anywhere from 5 milliseconds to over 50 milliseconds depending on your settings and system. While 50ms might not sound like much, it’s long enough to throw off your timing and make performing uncomfortable.
How Direct Monitoring Fixes the Problem
Direct monitoring creates a shortcut. Instead of waiting for your signal to travel through the computer and back, the interface routes a copy of your input signal directly to the headphone output. You hear yourself instantly, with zero latency.
The signal still goes to your computer for recording—you’re not bypassing anything important. You’re just monitoring a direct copy instead of the processed signal.
Most interfaces have a direct monitor switch or knob. A switch typically toggles between “direct” and “USB/playback.” A blend knob lets you mix between the direct signal and what’s coming back from your computer, giving you more control.
When to Use Direct Monitoring
Use it when recording: Any time latency is distracting you during performance, enable direct monitoring. This is especially important for vocalists and instrumentalists who need to hear themselves accurately in real-time.
Turn it off when mixing: During playback and mixing, you want to hear exactly what your DAW is producing—including any effects or processing. Direct monitoring would add your raw input signal on top of the playback, which isn’t what you want.
Drivers, Buffer Size, and Latency Settings
Beyond hardware, software settings play a crucial role in how your audio interface performs. Understanding drivers and buffer size helps you optimize your setup and troubleshoot common problems.
Audio Drivers: The Software Bridge
A driver is software that lets your computer communicate with hardware. Audio interface drivers are particularly important because audio demands precise, real-time data transfer.
Windows users: You’ll typically need to install ASIO drivers from your interface manufacturer. ASIO (Audio Stream Input/Output) bypasses Windows’ audio system, which adds latency. Without ASIO, you’ll experience noticeable delays. Download the latest drivers from your interface manufacturer’s website—they update them periodically with performance improvements and bug fixes.
Mac users: Apple’s Core Audio handles audio interface communication natively, and it’s quite efficient. Most interfaces work immediately when plugged in, without additional driver installation. Some manufacturers offer optional drivers with extra features, but they’re not always necessary.
The signal still goes to your computer for recording—you’re not bypassing anything important. You’re just monitoring a direct copy instead of the processed signal.
Buffer Size: The Speed vs. Stability Trade-off
Buffer size determines how much audio data your computer processes at once before sending it back out. It’s measured in samples (common values: 32, 64, 128, 256, 512, 1024).
Think of it like loading a truck. A small truck (low buffer) makes frequent trips—faster delivery but more work. A large truck (high buffer) makes fewer trips—slower delivery but more efficient.
Low buffer (32-128 samples): Minimal latency, but demands more CPU power. If your computer can’t keep up, you’ll hear crackling, pops, or dropouts. Use this setting when recording live and you need immediate response.
High buffer (512-1024 samples): More latency, but smooth playback even with complex projects. Use this when mixing, when latency doesn’t matter, or if your computer is struggling with a heavy session.
A practical workflow: set a low buffer when tracking (recording new parts), then increase the buffer when mixing and adding plugins.
Sample Rate: Stick to Standards
Sample rate determines how many snapshots of audio your interface captures per second. Common rates include 44.1kHz, 48kHz, 96kHz, and 192kHz.
Here’s honest advice: for home recording, use 44.1kHz (CD standard, great for music) or 48kHz (video standard, good if you work with video content). Higher sample rates consume more storage space and CPU resources without audible improvement in most home studio situations.
The one critical rule: make sure your DAW and your operating system are set to the same sample rate as your interface. Mismatched sample rates cause playback speed issues and the dreaded “chipmunk voice” or slow-motion effect.
Bit Depth: The Other Half of Digital Audio Quality
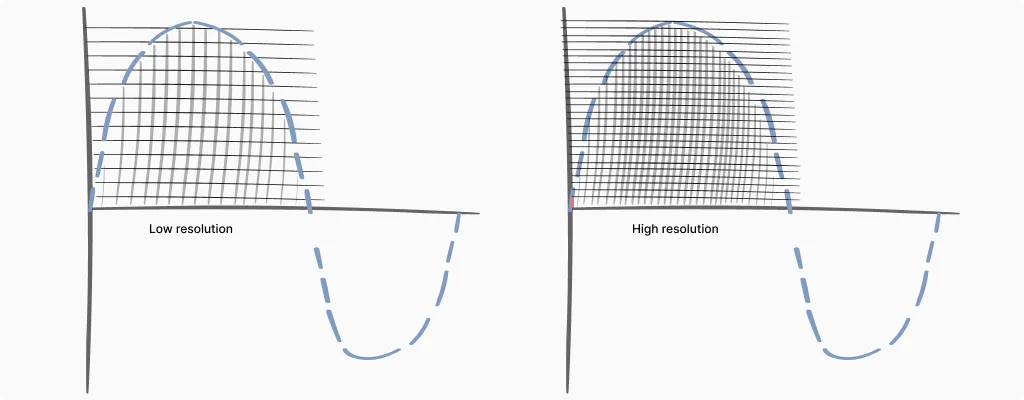
While sample rate gets most of the attention, bit depth is equally important—and arguably more relevant for home recording decisions.
Sample rate captures how often we take snapshots of audio (horizontal resolution, if you imagine a waveform). Bit depth determines how precisely we measure each snapshot’s volume (vertical resolution).
16-bit gives you 65,536 possible volume levels. This is CD quality, and it provides about 96 dB of dynamic range—the difference between the quietest sound you can capture and the loudest before distortion.
24-bit expands that to over 16 million possible levels and about 144 dB of dynamic range. That’s more range than any microphone or room can actually produce.
32-bit float is a newer format that essentially makes clipping impossible during recording. Even if your input signal distorts the preamp, the digital file itself maintains the full waveform information and can be scaled down later without damage.
Why Bit Depth Matters: The Noise Floor
Here’s where this gets practical. Every audio system has a noise floor—the quiet hiss that exists even when nothing is playing. With 16-bit recording, that noise floor sits about 96 dB below the loudest signal. If you record quietly (leaving lots of headroom), when you boost the signal later, you’re also boosting that noise floor closer to audibility.
Loopback: The Essential Feature for Streamers
If you stream on Twitch, YouTube, or any platform where your audience needs to hear both your voice and your computer audio—game sounds, music, video playback—loopback is the feature that makes it work smoothly.
What Loopback Does
Normally, audio flows in one direction: microphone into the interface, then to your computer. Loopback creates a second path, routing audio from your computer back through the interface as if it were another input.
This means your streaming software (OBS, Streamlabs, etc.) can receive both your microphone and your system audio through the same interface. Your voice and game audio arrive together in one clean signal, already mixed at the levels you set.
Without loopback, streamers often struggle with complicated software routing, virtual audio cables, or separate capture devices. Loopback simplifies everything.
How to Use Loopback
Most interfaces with loopback include a control panel application where you enable the feature and set levels. Typically, you’ll see a virtual “loopback” channel appear as an input option alongside your physical inputs.
In your streaming software, select the loopback channel as your audio source. Your microphone feeds through normally, and you adjust the blend of your voice versus system audio either in the interface’s control panel or in your streaming software.
One thing to watch: if you’re monitoring through speakers (not headphones), loopback can create feedback loops—your system audio goes out the speakers, back into the mic, back through loopback, and so on. Use headphones when loopback is active, or mute your monitors.
Which Interfaces Have Loopback?
Loopback has become standard on streaming-focused interfaces. The Focusrite Scarlett series (3rd and 4th gen) includes it, as does the Universal Audio Volt series, MOTU M-series, and many others. Budget interfaces sometimes skip this feature, so check specifications if streaming is your primary use case.
For a deeper dive into streaming setups, my audio interface for streaming guide covers additional considerations like mix-minus for podcasts and multi-platform broadcasting.
Can I Use an Audio Interface With My iPhone or iPad?
Yes—and mobile recording has become surprisingly capable. But there’s a catch that trips up many beginners: power.
The Power Problem: Power
Most audio interfaces are “bus-powered,” meaning they draw electricity through the USB cable from whatever device they’re connected to. A laptop handles this easily. An iPhone or iPad? Not so much.
Mobile devices have smaller batteries and stricter power limits. When you connect a power-hungry interface, one of two things happens: it doesn’t work at all, or your phone’s battery drains rapidly while struggling to power the interface.
The Solutions
For iPhones and older iPads (Lightning port): You need Apple’s Lightning to USB Camera Adapter, or better yet, the Lightning to USB 3 Camera Adapter, which includes a Lightning port for charging. This lets you power the iPad while the interface draws from the charger, not the battery.
For newer iPads (USB-C): Many interfaces connect directly via USB-C. However, you may still need a powered USB hub if the interface demands more power than the iPad provides. Smaller interfaces like the Focusrite Scarlett Solo or MOTU M2 often work without extra power; larger units may not.
The simplest test: Connect your interface and see if it works. If it does, great. If your iPad shows a “this accessory requires too much power” message, you need a powered hub or the charging adapter solution.
Which Interfaces Work Best With iOS?
Class-compliant interfaces work with iOS without additional drivers. Most modern interfaces from Focusrite, MOTU, Universal Audio, and others are class-compliant.
For a full breakdown of which interfaces work plug-and-play with mobile devices, including specific power requirements and adapter recommendations, check my Best Audio Interface for iPad guide. It covers tested combinations for GarageBand, recording apps, and mobile music production.
Troubleshooting Common Audio Interface Problems
Even when you understand your equipment, problems happen. Here are solutions to issues I’ve encountered repeatedly over the years.
Recording Only Plays in One Ear
This is probably the most common beginner problem. You record a vocal track, play it back, and the audio only comes out the left speaker or headphone.
The cause: You recorded a mono microphone signal onto a stereo track in your DAW.
The fix: Check your DAW’s track settings. When recording a single microphone or instrument, create a mono track, not a stereo track. Alternatively, set the track’s input to “Input 1” (mono) rather than “Input 1/2” (stereo).
Your recording is fine—it’s just a routing issue. If you’ve already recorded this way, most DAWs let you change the track from stereo to mono, or you can pan the stereo track to center, which sums both sides.
Robot Voice or Chipmunk Effect
Your playback sounds like a slowed-down monster or a sped-up chipmunk.
The cause: Sample rate mismatch between your interface, operating system, and DAW.
For newer iPads (USB-C): Many interfaces connect directly via USB-C. However, you may still need a powered USB hub if the interface demands more power than the iPad provides. Smaller interfaces like the Focusrite Scarlett Solo or MOTU M2 often work without extra power; larger units may not.
The fix: Open your audio interface’s control panel, note the sample rate. Then check your operating system’s sound settings and your DAW’s audio preferences. All three must match—usually 44.1kHz or 48kHz.
Crackling, Popping, or Audio Dropouts
Your audio plays but has intermittent clicks, pops, or brief silences.
The cause: Usually buffer size is too low for your system, or there’s a driver/software conflict.
The fix: Increase your buffer size first—try 256 or 512 samples. If that helps but doesn’t fully solve it, check that you’re using the manufacturer’s ASIO drivers (not generic Windows audio). Close other applications that might be competing for audio resources. Make sure your interface is plugged into a USB port directly on your computer, not through a hub.
Constant Hum or Buzz
A low, steady hum that doesn’t go away, sometimes with an electrical buzz component.
The cause: Ground loop, typically caused by multiple devices on different electrical circuits.
The fix: The most common culprit in home studios is the laptop charger. Try recording with your laptop running on battery power—if the hum disappears, you’ve found the problem. For desktop computers, a ground loop isolator on your monitor outputs can help. Make sure all your audio equipment plugs into the same power strip or outlet.
Microphone Produces No Signal
You’ve connected everything, but the meters show nothing.
The checklist:
- Is phantom power on? Condenser mics won’t work without it.
- Is the gain knob turned up? Start around 12 o’clock.
- Is the correct input selected in your DAW?
- Is the cable working? Try a different XLR cable.
- Is the interface selected as your audio device in your DAW and operating system?
How Built-in Analog Filters Are Changing Audio Interfaces
The world of audio interfaces is evolving rapidly, and one of the most intriguing trends in 2025 is the integration of built-in analog filters. Once the domain of synthesizers and high-end outboard gear, analog filters are now appearing in compact, affordable audio interfaces-offering producers and musicians a whole new palette of creative possibilities. Here’s how this technology is reshaping the recording landscape.
What Are Analog Filters in Audio Interfaces?
Analog filters are electronic circuits that shape the tone of an audio signal by allowing certain frequencies to pass while attenuating others. Classic analog filters are beloved for their warm, musical sound and are a staple in iconic synthesizers. When built into an audio interface, these filters let you process vocals, instruments, or any input signal with real analog character before the sound even hits your recording software.
Why Built-in Analog Filters Matter
Creative Sound Shaping at the Source: With an analog filter in your interface, you can sculpt your sound during recording, not just in post-production. This encourages a more hands-on, performance-driven approach and can lead to unique, inspiring results.
Analog Warmth and Character: Digital plugins are powerful, but analog filters are prized for their organic, musical response. Adding an analog filter to your recording chain can impart warmth, depth, and movement that’s hard to replicate with software alone.
Streamlined Workflow: Having analog processing built into your interface means less reliance on external gear or complex routing. This is especially valuable for home studios or mobile setups where space and simplicity are priorities.
Who Benefits Most from This Technology?
Electronic Music Producers: Shape synths, drum machines, and samples with classic analog filtering.
Guitarists and Vocalists: Add warmth, presence, or special effects to live performances or recordings.
Content Creators: Stand out with unique audio textures and real-time sound design.
Choosing the Right Audio Interface: Practical Buying Advice
After explaining what audio interfaces do, the natural question is: which one should I buy? Here’s practical guidance based on real needs, not marketing hype.
Don't Overbuy Inputs
If you’re a solo artist recording one track at a time, you don’t need eight inputs. A two-input interface covers vocals plus guitar, or a stereo keyboard, or two microphones for a podcast interview.
Count your actual needs: How many sources do you need to record simultaneously? If you record yourself playing guitar and singing, two inputs work. If you’re recording a full drum kit, you’ll need more.
Budget Recommendations
Entry-level (under $60): The Behringer U-Phoria UM2 or M-Audio M-Track Solo get you started with reliable basics. Sound quality is decent, though you’ll notice improvements if you upgrade later.
Best value (under $150): The Focusrite Scarlett Solo remains a popular choice for good reason—solid preamps, reliable drivers, and the included software bundle adds real value. The Universal Audio Volt 1 offers vintage-style coloration if you prefer a warmer sound character.
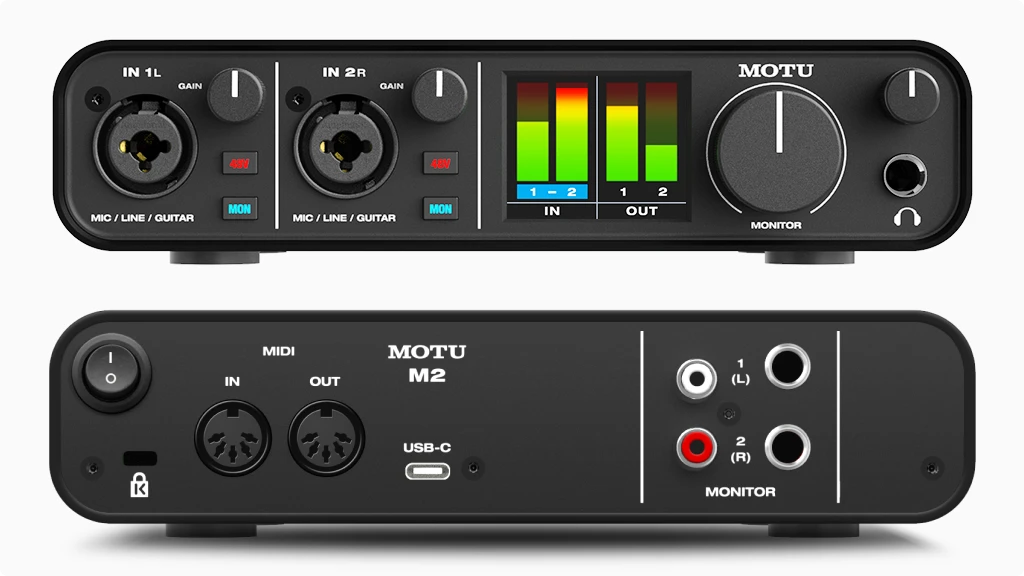
Future-proof (under $200): The MOTU M2 offers excellent converters and metering at this price point. The preamps sound clean and detailed, and the build quality suggests it’ll last years.
Don't Buy Software Yet: The Hidden Value in the Box
Here’s something that surprises many beginners: that $150 interface you’re considering often includes $300+ worth of recording software. Before you budget for a separate DAW purchase, check what’s in the box.
The software bundles are real. Focusrite interfaces include Ableton Live Lite, Pro Tools First, and a collection of plugins. PreSonus interfaces include Studio One Artist—a fully functional DAW, not a stripped demo. Universal Audio Volt interfaces come with their Spark plugin collection. These aren’t 30-day trials. They’re yours to keep.
The plugins matter too. Beyond the DAW, most manufacturers include instrument plugins, effects, and sample packs. Focusrite’s “Hitmaker Expansion” and similar bundles contain compressors, EQs, and virtual instruments used on actual commercial releases. For a beginner building a home studio, this software would cost hundreds if purchased separately.
Register immediately. The serial number on your interface box or registration card is your key to everything. Create an account on the manufacturer’s website (Focusrite, PreSonus, Universal Audio, etc.) and register your hardware within the first few days. Some software offers expire, and you don’t want to miss the window.
My recommendation: Start with the included DAW. Learn it. Ableton Live Lite, GarageBand, or Studio One Artist will do everything a beginner needs. If you outgrow it after a year of serious work, you’ll know exactly what features you actually need in an upgrade. Most people never need more than what’s included free.
Consider Your Use Case
Recording music? Prioritize preamp quality and low-latency performance.
Podcasting? A single XLR input might suffice—check out dedicated options in my audio interface for podcasting guide.
Streaming? Look for interfaces with direct monitoring and consider loopback features, which let you route computer audio back through the interface. My audio interface for streaming guide covers this in detail.
The Bottom Line
You don’t need to spend a fortune to get good results. A $100-150 interface from a reputable manufacturer will serve most home recording needs effectively. The differences between mid-range and high-end interfaces are real, but they become less important relative to your room acoustics, microphone choice, and performance quality.
Invest in learning your equipment well. A $100 interface in the hands of someone who understands gain staging, direct monitoring, and proper driver settings will produce better recordings than a $500 interface misused by someone who doesn’t.
Wrapping Up
An audio interface translates between your analog world of microphones and instruments and your computer’s digital world. It provides the preamps that amplify weak signals, the converters that digitize them, and the monitoring options that let you hear what you’re recording.
Understanding phantom power, direct monitoring, and latency settings transforms an audio interface from a confusing box into a tool you control confidently. And when problems arise—the one-sided recording, the crackling audio, the mysterious hum—you now have the knowledge to diagnose and fix them.
If you’re ready to explore specific options, my Best Budget Audio Interface roundup compares tested recommendations across different price points and use cases.
FAQ
Do I need an audio interface if I have a USB microphone?
Not necessarily. A USB microphone has a basic audio interface built in—it handles the analog-to-digital conversion internally. For simple podcasting, video calls, or casual voice recording, a USB mic works fine.
However, you’ll want a dedicated audio interface if you plan to record instruments, use multiple microphones simultaneously, or upgrade to professional XLR microphones later. An interface also gives you better preamps, lower latency, and more flexibility to grow your setup over time.
What's the difference between an audio interface and a mixer?
An audio interface converts analog audio to digital and sends it to your computer for recording. A mixer combines multiple audio sources and adjusts their levels, but traditional mixers don’t connect to computers at all.
Some modern devices combine both functions—USB mixers include an audio interface built in. For home recording where you’re tracking one or two sources at a time, a simple audio interface is usually more practical and cost-effective than a mixer. Mixers become useful when you need to blend many sources live, like for podcasts with multiple guests or live streaming setups.
Can I use an audio interface with GarageBand or free recording software?
Yes. Audio interfaces work with virtually any recording software (DAW), including free options like GarageBand, Audacity, and the lite versions of professional DAWs that come bundled with many interfaces. The interface handles the audio input and output; the software handles recording, editing, and mixing.
In fact, most beginners should start with free software. GarageBand on Mac or the bundled DAW that comes with your interface (like Ableton Live Lite with Focusrite, or Studio One Artist with PreSonus) provides everything you need to learn recording fundamentals.
Why does my recording have a delay when I monitor through headphones?
That delay is called latency—the time it takes for your audio to travel into the interface, through your computer, and back out to your headphones. It happens because digital audio processing isn’t instantaneous.
The solution is direct monitoring, a feature on most audio interfaces that routes your input signal straight to the headphones before it reaches the computer. This gives you zero-latency monitoring while still recording normally. Look for a “direct monitor” or “monitor mix” switch or knob on your interface.
How many inputs do I actually need on an audio interface?
For most home recording situations, two inputs are enough. This covers recording vocals with a microphone, guitar or bass direct, a stereo keyboard, or two sources simultaneously (like acoustic guitar and vocals together).
You only need more inputs if you’re recording multiple sources at the same time—like a full drum kit (8+ mics), a band playing live together, or a podcast with several guests on separate microphones. Don’t overbuy inputs you won’t use; that money is better spent on a higher-quality two-input interface or a better microphone.
| Why Can You Trust Us

Bruno Bontempo
Há mais de 20 anos gravo, produzo e toco baixo — desde as turnês com minha primeira banda aos 15 anos até tocar metal progressivo pela Europa hoje em dia. Ao longo de inúmeros álbuns, projetos (Madness of Light, Rising Course, Roots of Ascendant, Human|Archive) e trabalhos de produção, testei interfaces de áudio em todos os cenários imagináveis. No Best Audio Hub, combino minha formação como historiador com anos de experiência prática em música e áudio. Sem conversa fiada de marketing — apenas opiniões honestas de quem está na linha de frente.
| ALSO REVIEWED