What Is an Audio Interface and Why You Need One
- Audio Interface, Setup and Tutorials
- by Bruno Bontempo
What is an audio interface? Learn how it improves your recordings, what phantom power and direct monitoring do, and how to fix common problems like latency and crackling audio.
Our articles may include affiliate links and we may earn a commission. Here how it works.
Jump to...
What Is an Audio Interface? Complete Guide for Beginners
If you’ve ever tried recording music, starting a podcast, or streaming with decent audio quality, you’ve probably run into this question: do I need an audio interface? And then immediately after: what even is an audio interface?
I remember asking the same thing when I started recording my band years ago. We had microphones, guitars, and a computer—but the recordings sounded thin, noisy, and frustrating. The missing piece was an audio interface, and understanding what it does changed everything about how I approach recording.
In this guide, I’ll break down what an audio interface is, why it matters for your recordings, and how to actually use one without getting lost in technical jargon. Whether you’re recording vocals, guitars, podcasts, or streams, you’ll walk away knowing exactly what you need.
What Is an Audio Interface? The Simple Explanation
An audio interface is a translator between your microphones, instruments, and computer.
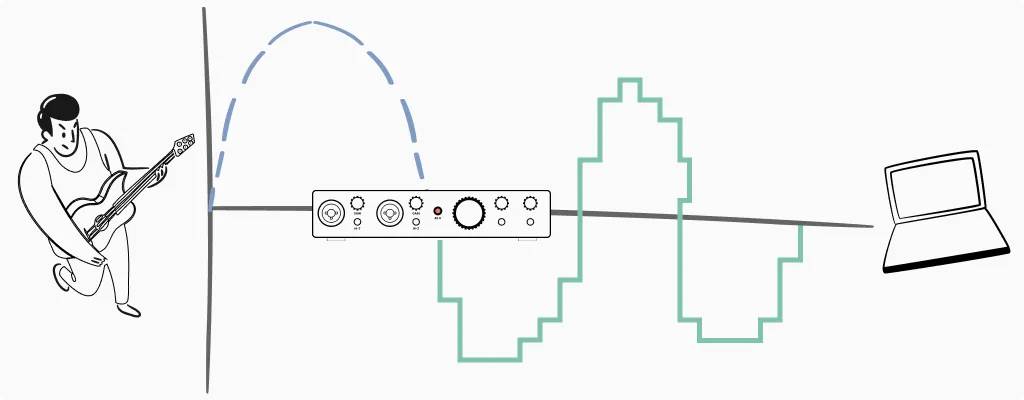
Your guitar, bass, drums, etc… produces an analog electrical signal. Your condenser microphone does the same. But your computer only understands digital information—ones and zeros. Someone needs to convert that analog signal into digital data your recording software can work with.
That’s what an audio interface does. It takes the analog signal from your microphone or instrument, converts it to digital (through something called an Analog-to-Digital Converter, or ADC), and sends it to your computer. When you play back your recording, the interface does the reverse—converting digital audio back to analog so you can hear it through your headphones or monitors.

Think of it like a language interpreter at a meeting. Your guitar “speaks” voltage. Your computer “speaks” binary code. The audio interface translates both directions so they can communicate.
Can't I Just Use a USB Microphone?
You can. USB microphones have built-in audio interfaces—they handle the conversion internally. For video calls, simple voice recordings, or casual content, they work fine.
However, USB microphones have limitations. You’re locked into one microphone with fixed preamp quality. You can’t swap mics easily or use professional XLR microphones. And if you want to record guitar or bass directly, a USB mic won’t help at all.
A dedicated audio interface, even a budget option like the Focusrite Scarlett Solo, gives you flexibility. You can connect different microphones, plug in instruments directly, and upgrade individual components over time. For anyone serious about recording music, it’s the better long-term investment.
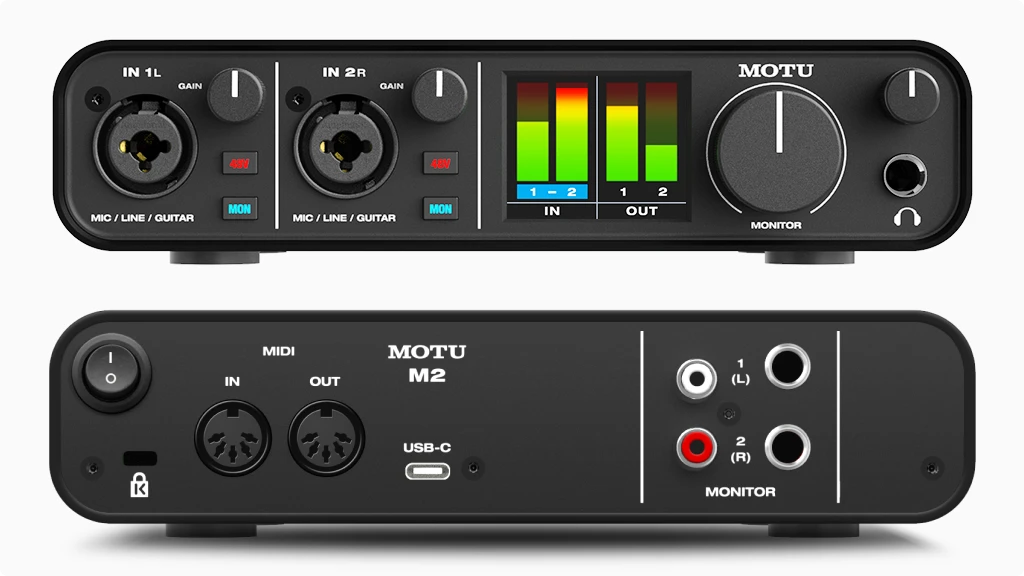
The Anatomy of an Audio Interface: What Are All Those Holes?
Look at any audio interface and you’ll see a collection of inputs, outputs, knobs, and buttons. It can seem intimidating at first, but each element serves a specific purpose. Let me walk you through what you’ll encounter.
Inputs: Where Your Sound Goes In
XLR Inputs are the three-pin circular connectors. These are designed for microphones—particularly condenser and dynamic mics that use standard XLR cables. Professional microphones almost universally use XLR connections because they provide balanced audio (which reduces noise over long cable runs).
1/4″ Jack Inputs look like enlarged headphone jacks. These accept instruments like guitars, basses, and keyboards. Some interfaces have dedicated instrument inputs, while others have “combo jacks.”
Combo Jacks are the clever solution most modern interfaces use. They’re the inputs that look like a circle within a circle—an XLR connector with a 1/4″ jack in the center. Plug in a microphone cable, and it connects to the XLR portion. Plug in an instrument cable, and it connects to the 1/4″ jack. One input, two purposes.
The Hi-Z Button (Instrument Switch)
Next to some 1/4″ inputs, you’ll find a button labeled “Hi-Z,” “Inst,” or showing a guitar icon. This switch changes the input impedance to properly receive signals from electric guitars and basses.
Here’s the rule: if you’re plugging a guitar or bass directly into the interface (without going through a pedal or amp), engage the Hi-Z button. If you’re connecting a keyboard, synthesizer, or the output from a guitar pedal, leave it off.
Why does this matter? Guitars have high-impedance outputs. If you plug them into a low-impedance input, you’ll lose low frequencies and the sound becomes thin and weak. The Hi-Z switch matches the impedance properly, preserving your instrument’s full tone.
Gain Knobs: Your Volume Traffic Cop
The gain knob controls how much the interface amplifies your input signal before converting it to digital. This is one of the most important controls on your interface, and getting it right makes a significant difference in your recordings.
Set the gain too low, and your signal will be quiet with a poor signal-to-noise ratio. Set it too high, and the signal clips—digital distortion that sounds harsh and can’t be fixed in post-production.
Most interfaces have some form of level indicator near each gain knob. Green means your signal is at a healthy level. Yellow or amber means you’re getting hot—close to the limit. Red means you’re clipping, and you need to turn down.
A practical approach: have the performer play or sing at their loudest, then set the gain so the meter peaks in the green or just touches yellow. This leaves headroom for unexpected loud moments while keeping the signal strong.
How to Set Your Levels: The "Check, Check" Technique
Knowing what the gain knob does is one thing. Setting it correctly is another. Here’s the practical technique I use every time I record.
The mistake most beginners make: they say “check, check” quietly into the mic, set the gain, then start singing at full volume and immediately clip. The quiet test was useless.
The procedure: Before recording, perform the loudest part of your song or spoken piece. If you’re a singer, belt out the chorus. If you’re a guitarist, play the aggressive section. If you’re podcasting, speak as enthusiastically as you would during an excited story. This is your reference point.
The target: While performing at full intensity, watch the meter. You want peaks landing around -12dB to -6dB. On most interface meters, this means the green lights are active with occasional yellow. You should never see red during your loudest moments.
The myth to forget: “I need to record as loud as possible.” This was true with analog tape, where recording hot reduced tape hiss. Digital recording doesn’t work that way. A signal recorded at -12dB has essentially the same quality as one recorded at -1dB—you just turn it up later in your DAW with no penalty.
The concept: Headroom. Headroom is the safety margin between your peaks and the clipping point (0dB). Leaving 6-12dB of headroom means unexpected loud moments won’t distort your take. You can always boost a clean quiet recording. You cannot fix a clipped one.
If you’re unsure, err on the side of quieter. A slightly low recording level is infinitely better than a clipped one.
Outputs: Where Your Sound Comes Out
Monitor Outputs (usually on the back) connect to your studio monitors or speakers. These are typically 1/4″ TRS jacks. The main volume knob on your interface controls their level.
Headphone Outputs (usually on the front) let you monitor your recording privately. They have their own volume control, separate from the monitor output. This is useful when you need different volume levels for headphones versus speakers, or when tracking vocals and you want to mute the monitors entirely.
Why the separation? If you’re recording vocals with a microphone, you can’t have sound coming from speakers—it would feed back into the mic. You need headphones. But when mixing, you might prefer speakers. Having independent outputs and controls lets you switch between monitoring methods easily.
Cables and Connections: The Complete Guide
I’ve seen cable confusion trip up so many beginners. You buy an audio interface, grab a cable from your guitar case, plug it into the monitor outputs, and wonder why things sound wrong. Or you see “USB-C” on the box but your computer has “USB-A” ports. Let me clear this up.

Computer Connections: USB and Thunderbolt
Before we talk about audio cables, let’s cover how your interface connects to your computer. This determines speed, latency, and compatibility.
USB 2.0 is still common on budget interfaces. It’s the rectangular USB-A connector you’ve used for years. Despite being “old,” USB 2.0 handles stereo recording and playback without issues. For a simple two-input interface, it’s perfectly adequate. Maximum bandwidth: 480 Mbps.
USB 3.0 / USB 3.1 / USB 3.2 offer significantly more bandwidth (5-20 Gbps depending on version). You’ll see these on interfaces with many channels or high sample rates. USB 3.0 ports are often blue inside to distinguish them from USB 2.0.
USB-A vs. USB-B vs. USB-C refers to the physical connector shape, not the speed:
- USB-A is the flat rectangular plug on your computer
- USB-B is the square-ish plug that connects to printers, older interfaces, and some MIDI gear
- USB-C is the small, reversible oval connector found on newer laptops and interfaces
Many modern interfaces use USB-C on the device side, with a USB-C to USB-A cable included for compatibility with older computers. The Focusrite Scarlett 4th Gen series uses USB-C, for example.
Thunderbolt is Apple’s high-speed connection, now adopted more broadly. It offers dramatically lower latency than USB because it provides a more direct path to your computer’s processor.
- Thunderbolt 1 & 2 use the Mini DisplayPort connector (rectangular with angled corners). Found on older Macs and some professional interfaces.
- Thunderbolt 3 & 4 use the USB-C connector shape, but don’t confuse them—a Thunderbolt 3 port can accept USB-C devices, but a USB-C port cannot run Thunderbolt devices unless specifically labeled. Look for the lightning bolt icon.
Thunderbolt interfaces like the Universal Audio Apollo series or RME products offer rock-bottom latency, which matters for running real-time plugins while recording. However, they cost more and require compatible ports.
Which connection do you need? For most home studios, USB (any version) works fine. Thunderbolt becomes relevant when you need many simultaneous channels, ultra-low latency for real-time processing, or you’re working in professional environments where every millisecond matters.
Audio Cables: Analog Connections
Now let’s cover the cables that carry your actual audio signal.
TS (Tip-Sleeve) — 1/4" Unbalanced

Look at the tip of a 1/4″ cable and count the black rings (insulators) between the metal sections. One black ring means TS.
TS cables have two conductors: the tip carries the signal, the sleeve is ground. This is an unbalanced connection. Your standard guitar cable is TS. These work fine for short runs (under 15-20 feet) but can pick up interference on longer distances.
TRS (Tip-Ring-Sleeve) — 1/4" Balanced
Two black rings means TRS. Three conductors: tip carries the positive signal, ring carries an inverted copy (negative), sleeve is ground.
Why does this matter? Balanced cables reject interference. Any noise picked up along the cable affects both positive and negative signals equally. At the receiving end, the device flips the negative signal back and combines it with the positive. The original audio doubles in strength while the noise cancels itself out.
Use TRS cables for connecting your interface’s monitor outputs to studio monitors, and for any balanced line-level connection.
XLR — The Professional Standard
XLR cables have three pins (male) or three holes (female) in a circular housing with a locking mechanism. Like TRS, XLR is balanced, providing the same noise rejection benefits.
XLR is the universal standard for microphones. The locking connector prevents accidental disconnection during performances, and the balanced design allows cable runs of 50+ feet without picking up hum or buzz.
Some interfaces have XLR outputs for connecting to powered speakers or PA systems. When you see XLR, think “professional and reliable.”
RCA — Consumer and DJ Gear
RCA connectors are the red and white (or red and black) plugs you’ve seen on home stereos and DJ equipment. They’re unbalanced and typically used in pairs for stereo signals.
You won’t find RCA on most audio interfaces, but some DJ-focused units include them for connecting to club mixers or turntables. If you need to connect RCA gear to your interface, you’ll need RCA-to-1/4″ adapter cables.
3.5mm (1/8") — Mini Jack
The headphone jack on your phone. Some portable interfaces and consumer gear use 3.5mm connections. Like 1/4″ jacks, these come in TS (unbalanced) and TRS (balanced/stereo) versions.
If your interface has a 1/4″ headphone output and you want to use earbuds with a 3.5mm plug, a simple adapter solves the problem.
Digital Audio Connections
Beyond analog cables, some interfaces offer digital connections for expanding your setup or connecting to other digital gear.
ADAT (Optical/Toslink)
ADAT uses fiber optic cables to transmit up to 8 channels of digital audio over a single thin cable. The connector looks like a small square with a red light inside when active.
Interfaces like the Focusrite Clarett+ 4Pre include ADAT inputs, allowing you to add an external 8-channel preamp and expand from 4 inputs to 12 without buying an entirely new interface.
ADAT is unidirectional—you need separate cables for input and output. At standard sample rates (44.1/48kHz), you get 8 channels. At higher rates, channel count drops (4 channels at 96kHz).
S/PDIF (Coaxial or Optical)
S/PDIF carries 2 channels of digital audio. The coaxial version uses RCA-style connectors with 75-ohm cable (looks like RCA but the cable matters). The optical version uses the same Toslink connectors as ADAT but carries only stereo.
You might use S/PDIF to connect a standalone preamp with digital output, or to send audio to an external headphone amp with digital input.
MIDI (5-Pin DIN)
While not audio, MIDI cables often appear on audio interfaces. The round 5-pin connectors carry note data, controller information, and clock signals between synthesizers, drum machines, and your computer.
Many modern interfaces include MIDI I/O, eliminating the need for a separate MIDI interface. If you use hardware synthesizers or drum machines, this is a useful feature to look for.
For more on MIDI-equipped interfaces, see my Best Audio Interface with MIDI guide.
Why You Can't Use a Guitar Cable for Speakers
Your guitar cable is TS (unbalanced). Your monitor outputs are typically TRS (balanced). If you connect them with a guitar cable, several problems occur.
First, you’re ignoring the balanced signal. The monitor output sends both positive and negative signals, but the TS cable only picks up one. You lose the noise rejection benefits entirely.
Second, you might introduce a ground loop. The cable isn’t wired to handle the balanced output properly, and depending on your equipment, this can create hum or buzz.
Third, some interfaces may reduce output level or sound thin because the connection isn’t matched correctly.
The solution is simple: use TRS cables for connecting your interface’s monitor outputs to your studio monitors. They’re not expensive—a decent pair costs around $15-20.
Cable Quality: Does It Matter?
For short runs in a home studio (under 10 feet), cable quality makes minimal audible difference. Buy cables with solid connectors—Neutrik is the industry standard—and they’ll last years. Avoid the cheapest no-name cables, not because they sound worse, but because the connectors tend to fail.
For longer runs, balanced cables matter more than expensive cables. A $15 balanced TRS cable will outperform a $50 unbalanced TS cable over a 20-foot run, simply because of noise rejection.
For digital cables (optical, coaxial S/PDIF), quality matters even less for short runs—the signal is either perfect or it isn’t. Just ensure optical cables aren’t sharply bent, as this can damage the fiber.
Phantom Power: The 48V Button Explained
Nearly every audio interface has a button labeled “+48V” or “Phantom Power.” This is one of the features that confuses beginners most, but it’s straightforward once you understand what it does—and which microphones need it.
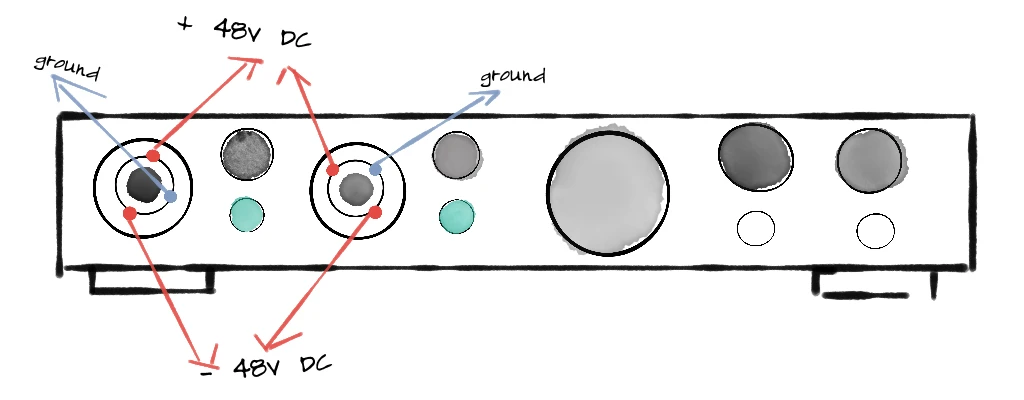
What Phantom Power Actually Does
Phantom power sends 48 volts of DC electricity through the XLR cable to power microphones that need external electricity to operate. The term “phantom” comes from the fact that this power is invisible—it travels along the same wires as your audio signal without interfering with it.
Think of it like gasoline for certain microphones. Without it, they simply won’t produce any signal.
But not all microphones need phantom power. Understanding the three main microphone types helps you know when to use it.
Microphone Types: Which Ones Need Phantom Power?
Condenser Microphones — Always Need Phantom Power
Condenser mics use an electrically charged capsule with two thin plates (a diaphragm and a backplate) separated by a small air gap. Sound waves move the diaphragm, changing the distance between the plates and creating variations in electrical capacitance. This requires power to maintain the charge and amplify the tiny signal.
Condensers are prized for their detail and sensitivity. They capture high frequencies and subtle nuances that other mic types might miss. This makes them popular for vocals, acoustic instruments, and studio recording where you want to capture every detail.
The tradeoff: that same sensitivity picks up room noise, air conditioning hum, and keyboard clicks. Condensers work best in treated, quiet spaces.
Common examples: Audio-Technica AT2020, Rode NT1, Neumann U87, AKG C414.
Large Diaphragm vs. Small Diaphragm Condensers
Large diaphragm condensers (LDCs) have capsules roughly 1 inch or larger. They tend to sound warm and full, with a slight emphasis on low-mid frequencies. Most vocal microphones are large diaphragm condensers.
Small diaphragm condensers (SDCs), sometimes called pencil condensers, have capsules under 1 inch. They respond faster to transients and capture high frequencies more accurately, making them ideal for acoustic guitars, drum overheads, and orchestral recording.
Both types require phantom power.
Dynamic Microphones — No Phantom Power Needed
Dynamic mics work like speakers in reverse. A diaphragm attached to a coil of wire moves within a magnetic field, generating an electrical signal through electromagnetic induction. No external power required—the sound wave itself creates the electricity.
Dynamics are workhorses. They handle high volumes without distortion, reject background noise effectively, and survive being dropped, bumped, and generally abused. This makes them standard equipment for live performance, guitar amplifiers, drums, and broadcast.
The tradeoff: dynamics are less sensitive than condensers. They won’t capture the same level of detail, particularly in high frequencies. For some applications, this is actually an advantage—a dynamic mic on a snare drum naturally tames harsh transients.
Common examples: Shure SM58 (vocals), Shure SM57 (instruments), Sennheiser MD421, Electro-Voice RE20.
What happens if you send phantom power to a dynamic mic? Usually nothing. Most modern dynamic microphones are designed to ignore phantom power safely. However, there’s no benefit to leaving it on, and some vintage or unusual dynamics might not handle it well. Best practice: only enable phantom power when you need it.
Ribbon Microphones — Handle With Care
Ribbon mics use a thin strip of metal (the ribbon) suspended in a magnetic field. Sound waves move the ribbon, generating a signal. They’re known for their smooth, natural sound with a gentle high-frequency roll-off that flatters vocals and tames harsh sources.
Here’s where phantom power becomes critical: passive ribbon microphones can be damaged or destroyed by phantom power. The 48V can magnetize or even burn the delicate ribbon element. If you have a passive ribbon mic, make absolutely certain phantom power is off before connecting it.
Active ribbon microphones are a different story. These have built-in electronics that actually require phantom power to operate, and they’re designed to handle it safely. Always check your ribbon mic’s documentation.
Common passive ribbons: Royer R-121, AEA R84, Coles 4038. Common active ribbons: Royer R-122, AEA A440, sE Electronics Voodoo VR1.
The rule for ribbons: When in doubt, leave phantom power off. Only enable it if you’ve confirmed your specific ribbon mic requires it.
DI Boxes: When Instruments Need Help
A DI box (Direct Injection or Direct Input box) converts unbalanced, high-impedance signals from instruments into balanced, low-impedance signals suitable for microphone inputs. They solve several problems at once.
Why use a DI box?
Your bass guitar or acoustic guitar with a pickup produces a high-impedance, unbalanced signal. Plugging directly into an interface’s instrument input works for short cable runs, but DI boxes offer advantages:
- Balanced output: The DI converts to a balanced signal, allowing long cable runs without noise pickup. Essential for live performance where cables might run 50+ feet to the mixing console.
- Ground lift: Most DI boxes include a ground lift switch that breaks ground loops, eliminating hum and buzz.
- Impedance matching: Proper impedance conversion ensures your instrument’s full tone reaches the recording.
- Thru output: Many DIs include a pass-through jack, letting you send signal to both an amplifier and the interface simultaneously.
Passive vs. Active DI Boxes
Passive DI boxes use a transformer to convert the signal. No power needed. They work well with active instruments (basses and guitars with built-in preamps, keyboards, synthesizers) that output strong signals.
Active DI boxes include electronic circuitry that requires power—either from a battery or phantom power from your interface. They’re better suited for passive instruments (standard electric guitars and basses without active electronics) because they can handle high-impedance sources without signal loss.
Here’s the connection to phantom power: if your active DI box doesn’t have a battery or external power supply, it needs phantom power from your interface to operate. Enable 48V when using an active DI through an XLR input.
Common passive DIs: Radial ProDI, Whirlwind IMP 2. Common active DIs: Radial J48, Countryman Type 85, BSS AR-133.
The Golden Rule for Phantom Power
To avoid loud pops that can damage speakers or headphones (and potentially harm sensitive equipment like passive ribbon mics), follow this sequence:
When connecting: Plug in your microphone first, then turn on phantom power.
When disconnecting: Turn off phantom power first, wait a few seconds for capacitors to discharge, then unplug your microphone.
This habit prevents the sudden voltage surge that causes those alarming pops. It takes three extra seconds and saves you from potential equipment damage.
Direct Monitoring: How to Record Without Delay
Here’s a scenario every home recording musician encounters: you plug in your microphone, put on headphones, and start recording. But something feels wrong. When you speak or sing, there’s a slight delay before you hear yourself. It’s disorienting, like talking on a bad phone connection.
This delay is called latency, and direct monitoring is the solution.
Why Latency Happens
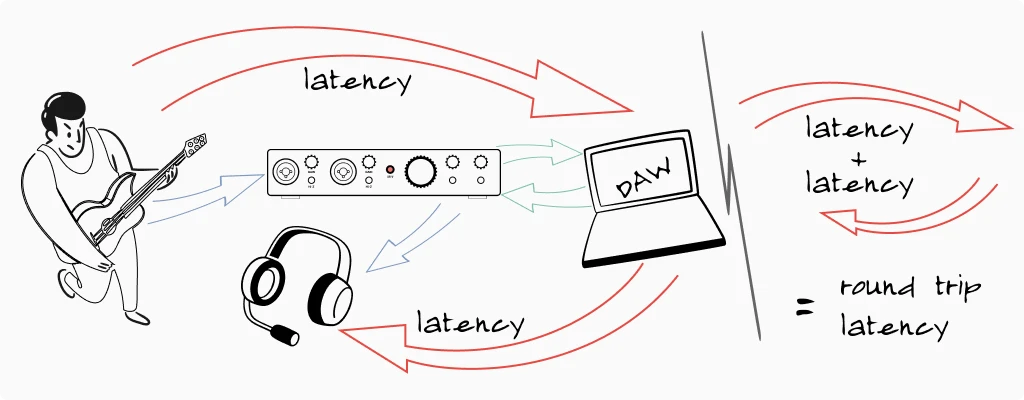
When you record through an audio interface, your signal takes a journey. It goes from your microphone, into the interface, gets converted to digital, travels through a USB cable to your computer, gets processed by your recording software (DAW), travels back through the USB cable, gets converted back to analog, and finally reaches your headphones.
That entire round trip takes time—anywhere from 5 milliseconds to over 50 milliseconds depending on your settings and system. While 50ms might not sound like much, it’s long enough to throw off your timing and make performing uncomfortable.
How Direct Monitoring Fixes the Problem
Direct monitoring creates a shortcut. Instead of waiting for your signal to travel through the computer and back, the interface routes a copy of your input signal directly to the headphone output. You hear yourself instantly, with zero latency.
The signal still goes to your computer for recording—you’re not bypassing anything important. You’re just monitoring a direct copy instead of the processed signal.
Most interfaces have a direct monitor switch or knob. A switch typically toggles between “direct” and “USB/playback.” A blend knob lets you mix between the direct signal and what’s coming back from your computer, giving you more control.
When to Use Direct Monitoring
Use it when recording: Any time latency is distracting you during performance, enable direct monitoring. This is especially important for vocalists and instrumentalists who need to hear themselves accurately in real-time.
Turn it off when mixing: During playback and mixing, you want to hear exactly what your DAW is producing—including any effects or processing. Direct monitoring would add your raw input signal on top of the playback, which isn’t what you want.
Drivers, Buffer Size, and Latency Settings
Beyond hardware, software settings play a crucial role in how your audio interface performs. Understanding drivers and buffer size helps you optimize your setup and troubleshoot common problems.
Audio Drivers: The Software Bridge
A driver is software that lets your computer communicate with hardware. Audio interface drivers are particularly important because audio demands precise, real-time data transfer.
Windows users: You’ll typically need to install ASIO drivers from your interface manufacturer. ASIO (Audio Stream Input/Output) bypasses Windows’ audio system, which adds latency. Without ASIO, you’ll experience noticeable delays. Download the latest drivers from your interface manufacturer’s website—they update them periodically with performance improvements and bug fixes.
Mac users: Apple’s Core Audio handles audio interface communication natively, and it’s quite efficient. Most interfaces work immediately when plugged in, without additional driver installation. Some manufacturers offer optional drivers with extra features, but they’re not always necessary.
The signal still goes to your computer for recording—you’re not bypassing anything important. You’re just monitoring a direct copy instead of the processed signal.
Buffer Size: The Speed vs. Stability Trade-off
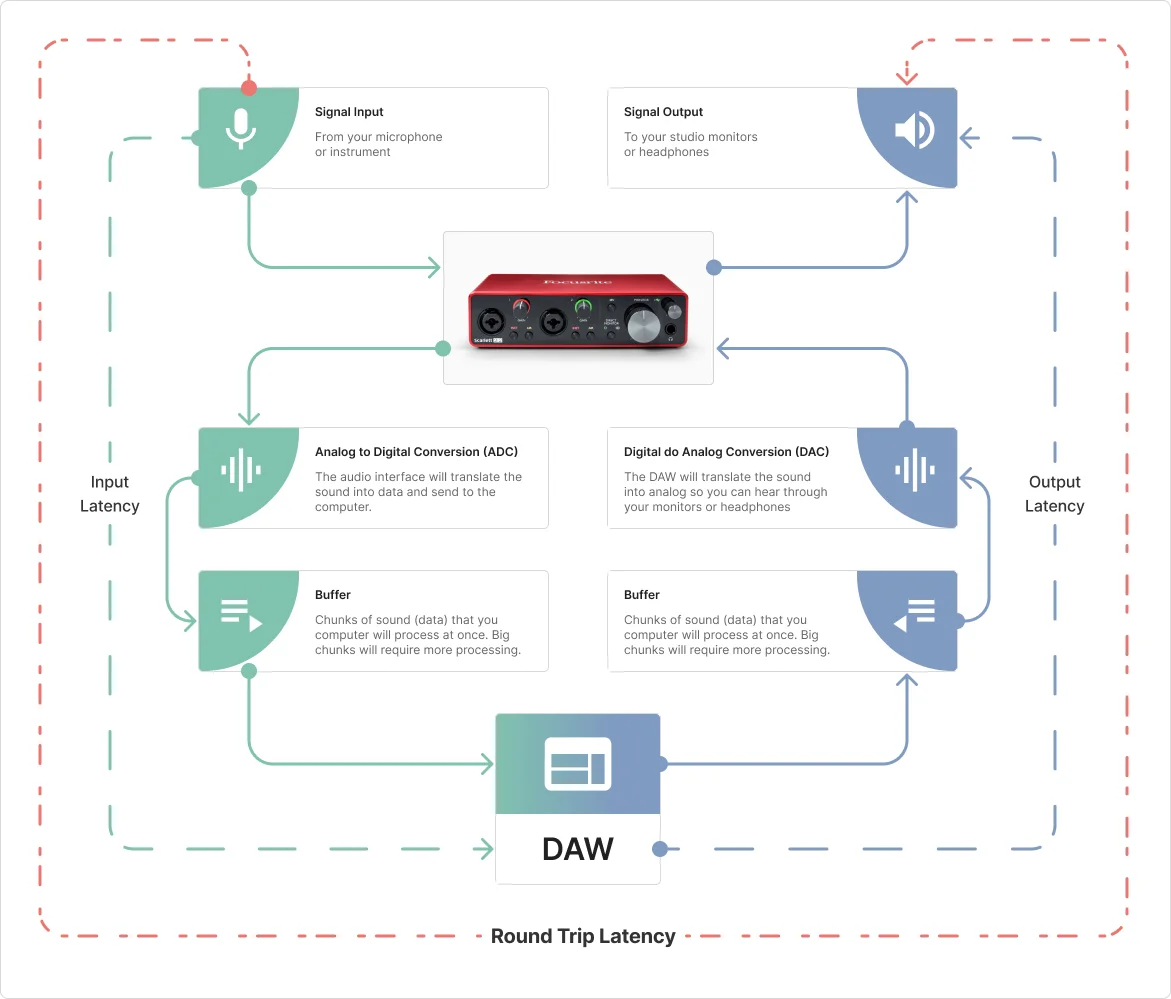
Buffer size determines how much audio data your computer processes at once before sending it back out. It’s measured in samples (common values: 32, 64, 128, 256, 512, 1024).
Think of it like loading a truck. A small truck (low buffer) makes frequent trips—faster delivery but more work. A large truck (high buffer) makes fewer trips—slower delivery but more efficient.
Low buffer (32-128 samples): Minimal latency, but demands more CPU power. If your computer can’t keep up, you’ll hear crackling, pops, or dropouts. Use this setting when recording live and you need immediate response.
High buffer (512-1024 samples): More latency, but smooth playback even with complex projects. Use this when mixing, when latency doesn’t matter, or if your computer is struggling with a heavy session.
A practical workflow: set a low buffer when tracking (recording new parts), then increase the buffer when mixing and adding plugins.
Sample Rate: Stick to Standards
Sample rate determines how many snapshots of audio your interface captures per second. Common rates include 44.1kHz, 48kHz, 96kHz, and 192kHz.
Here’s honest advice: for home recording, use 44.1kHz (CD standard, great for music) or 48kHz (video standard, good if you work with video content). Higher sample rates consume more storage space and CPU resources without audible improvement in most home studio situations.
The one critical rule: make sure your DAW and your operating system are set to the same sample rate as your interface. Mismatched sample rates cause playback speed issues and the dreaded “chipmunk voice” or slow-motion effect.
Bit Depth: The Other Half of Digital Audio Quality
While sample rate gets most of the attention, bit depth is equally important—and arguably more relevant for home recording decisions.
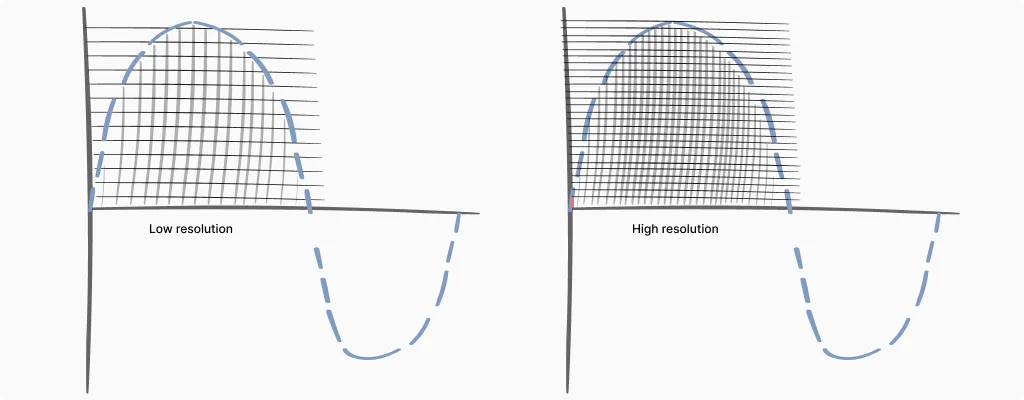
Sample rate captures how often we take snapshots of audio (horizontal resolution, if you imagine a waveform). Bit depth determines how precisely we measure each snapshot’s volume (vertical resolution).
16-bit gives you 65,536 possible volume levels. This is CD quality, and it provides about 96 dB of dynamic range—the difference between the quietest sound you can capture and the loudest before distortion.
24-bit expands that to over 16 million possible levels and about 144 dB of dynamic range. That’s more range than any microphone or room can actually produce.
32-bit float is a newer format that essentially makes clipping impossible during recording. Even if your input signal distorts the preamp, the digital file itself maintains the full waveform information and can be scaled down later without damage.
Why Bit Depth Matters: The Noise Floor
Here’s where this gets practical. Every audio system has a noise floor—the quiet hiss that exists even when nothing is playing. With 16-bit recording, that noise floor sits about 96 dB below the loudest signal. If you record quietly (leaving lots of headroom), when you boost the signal later, you’re also boosting that noise floor closer to audibility.
Loopback: The Essential Feature for Streamers
If you stream on Twitch, YouTube, or any platform where your audience needs to hear both your voice and your computer audio—game sounds, music, video playback—loopback is the feature that makes it work smoothly.
What Loopback Does
Normally, audio flows in one direction: microphone into the interface, then to your computer. Loopback creates a second path, routing audio from your computer back through the interface as if it were another input.
This means your streaming software (OBS, Streamlabs, etc.) can receive both your microphone and your system audio through the same interface. Your voice and game audio arrive together in one clean signal, already mixed at the levels you set.
Without loopback, streamers often struggle with complicated software routing, virtual audio cables, or separate capture devices. Loopback simplifies everything.
How to Use Loopback
Most interfaces with loopback include a control panel application where you enable the feature and set levels. Typically, you’ll see a virtual “loopback” channel appear as an input option alongside your physical inputs.
In your streaming software, select the loopback channel as your audio source. Your microphone feeds through normally, and you adjust the blend of your voice versus system audio either in the interface’s control panel or in your streaming software.
One thing to watch: if you’re monitoring through speakers (not headphones), loopback can create feedback loops—your system audio goes out the speakers, back into the mic, back through loopback, and so on. Use headphones when loopback is active, or mute your monitors.
Which Interfaces Have Loopback?
Loopback has become standard on streaming-focused interfaces. The Focusrite Scarlett series (3rd and 4th gen) includes it, as does the Universal Audio Volt series, MOTU M-series, and many others. Budget interfaces sometimes skip this feature, so check specifications if streaming is your primary use case.
For a deeper dive into streaming setups, my audio interface for streaming guide covers additional considerations like mix-minus for podcasts and multi-platform broadcasting.
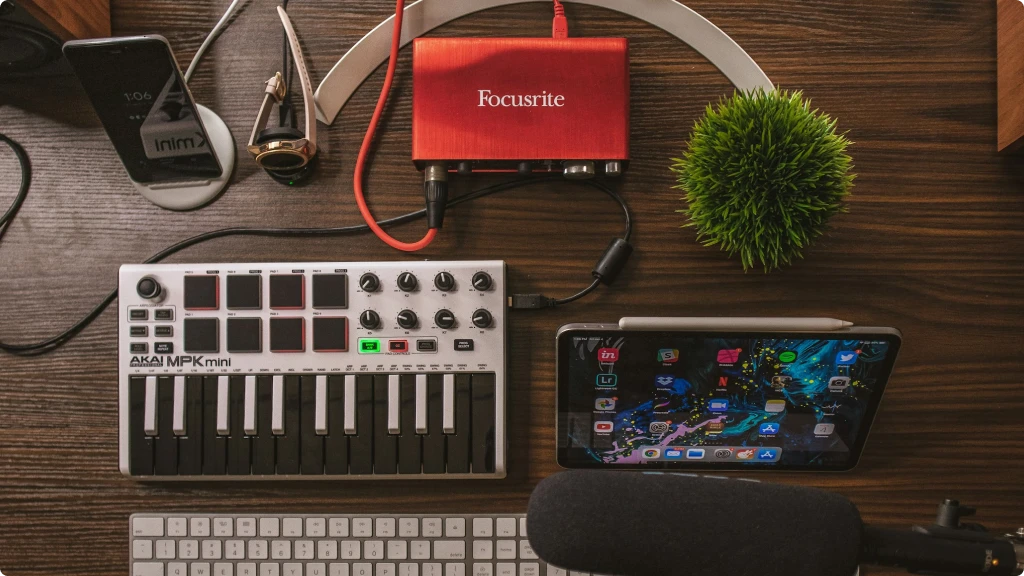
Can I Use an Audio Interface With My iPhone or iPad?
Yes—and mobile recording has become surprisingly capable. But there’s a catch that trips up many beginners: power.
The Power Problem: Power
Most audio interfaces are “bus-powered,” meaning they draw electricity through the USB cable from whatever device they’re connected to. A laptop handles this easily. An iPhone or iPad? Not so much.
Mobile devices have smaller batteries and stricter power limits. When you connect a power-hungry interface, one of two things happens: it doesn’t work at all, or your phone’s battery drains rapidly while struggling to power the interface.
The Solutions
For iPhones and older iPads (Lightning port): You need Apple’s Lightning to USB Camera Adapter, or better yet, the Lightning to USB 3 Camera Adapter, which includes a Lightning port for charging. This lets you power the iPad while the interface draws from the charger, not the battery.
For newer iPads (USB-C): Many interfaces connect directly via USB-C. However, you may still need a powered USB hub if the interface demands more power than the iPad provides. Smaller interfaces like the Focusrite Scarlett Solo or MOTU M2 often work without extra power; larger units may not.
The simplest test: Connect your interface and see if it works. If it does, great. If your iPad shows a “this accessory requires too much power” message, you need a powered hub or the charging adapter solution.
Which Interfaces Work Best With iOS?
Class-compliant interfaces work with iOS without additional drivers. Most modern interfaces from Focusrite, MOTU, Universal Audio, and others are class-compliant.
For a full breakdown of which interfaces work plug-and-play with mobile devices, including specific power requirements and adapter recommendations, check my Best Audio Interface for iPad guide. It covers tested combinations for GarageBand, recording apps, and mobile music production.
Troubleshooting Common Audio Interface Problems
Even when you understand your equipment, problems happen. Here are solutions to issues I’ve encountered repeatedly over the years.
Recording Only Plays in One Ear
This is probably the most common beginner problem. You record a vocal track, play it back, and the audio only comes out the left speaker or headphone.
The cause: You recorded a mono microphone signal onto a stereo track in your DAW.
The fix: Check your DAW’s track settings. When recording a single microphone or instrument, create a mono track, not a stereo track. Alternatively, set the track’s input to “Input 1” (mono) rather than “Input 1/2” (stereo).
Your recording is fine—it’s just a routing issue. If you’ve already recorded this way, most DAWs let you change the track from stereo to mono, or you can pan the stereo track to center, which sums both sides.
Robot Voice or Chipmunk Effect
Your playback sounds like a slowed-down monster or a sped-up chipmunk.
The cause: Sample rate mismatch between your interface, operating system, and DAW.
For newer iPads (USB-C): Many interfaces connect directly via USB-C. However, you may still need a powered USB hub if the interface demands more power than the iPad provides. Smaller interfaces like the Focusrite Scarlett Solo or MOTU M2 often work without extra power; larger units may not.
The fix: Open your audio interface’s control panel, note the sample rate. Then check your operating system’s sound settings and your DAW’s audio preferences. All three must match—usually 44.1kHz or 48kHz.
Crackling, Popping, or Audio Dropouts
Your audio plays but has intermittent clicks, pops, or brief silences.
The cause: Usually buffer size is too low for your system, or there’s a driver/software conflict.
The fix: Increase your buffer size first—try 256 or 512 samples. If that helps but doesn’t fully solve it, check that you’re using the manufacturer’s ASIO drivers (not generic Windows audio). Close other applications that might be competing for audio resources. Make sure your interface is plugged into a USB port directly on your computer, not through a hub.
Constant Hum or Buzz
A low, steady hum that doesn’t go away, sometimes with an electrical buzz component.
The cause: Ground loop, typically caused by multiple devices on different electrical circuits.
The fix: The most common culprit in home studios is the laptop charger. Try recording with your laptop running on battery power—if the hum disappears, you’ve found the problem. For desktop computers, a ground loop isolator on your monitor outputs can help. Make sure all your audio equipment plugs into the same power strip or outlet.
Microphone Produces No Signal
You’ve connected everything, but the meters show nothing.
The checklist:
- Is phantom power on? Condenser mics won’t work without it.
- Is the gain knob turned up? Start around 12 o’clock.
- Is the correct input selected in your DAW?
- Is the cable working? Try a different XLR cable.
- Is the interface selected as your audio device in your DAW and operating system?
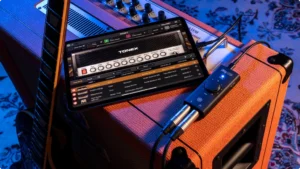
How Built-in Analog Filters Are Changing Audio Interfaces
The world of audio interfaces is evolving rapidly, and one of the most intriguing trends in 2025 is the integration of built-in analog filters. Once the domain of synthesizers and high-end outboard gear, analog filters are now appearing in compact, affordable audio interfaces-offering producers and musicians a whole new palette of creative possibilities. Here’s how this technology is reshaping the recording landscape.
What Are Analog Filters in Audio Interfaces?
Analog filters are electronic circuits that shape the tone of an audio signal by allowing certain frequencies to pass while attenuating others. Classic analog filters are beloved for their warm, musical sound and are a staple in iconic synthesizers. When built into an audio interface, these filters let you process vocals, instruments, or any input signal with real analog character before the sound even hits your recording software.
Why Built-in Analog Filters Matter
Creative Sound Shaping at the Source: With an analog filter in your interface, you can sculpt your sound during recording, not just in post-production. This encourages a more hands-on, performance-driven approach and can lead to unique, inspiring results.
Analog Warmth and Character: Digital plugins are powerful, but analog filters are prized for their organic, musical response. Adding an analog filter to your recording chain can impart warmth, depth, and movement that’s hard to replicate with software alone.
Streamlined Workflow: Having analog processing built into your interface means less reliance on external gear or complex routing. This is especially valuable for home studios or mobile setups where space and simplicity are priorities.
Who Benefits Most from This Technology?
Electronic Music Producers: Shape synths, drum machines, and samples with classic analog filtering.
Guitarists and Vocalists: Add warmth, presence, or special effects to live performances or recordings.
Content Creators: Stand out with unique audio textures and real-time sound design.
Choosing the Right Audio Interface: Practical Buying Advice
After explaining what audio interfaces do, the natural question is: which one should I buy? Here’s practical guidance based on real needs, not marketing hype.
Don't Overbuy Inputs
If you’re a solo artist recording one track at a time, you don’t need eight inputs. A two-input interface covers vocals plus guitar, or a stereo keyboard, or two microphones for a podcast interview.
Count your actual needs: How many sources do you need to record simultaneously? If you record yourself playing guitar and singing, two inputs work. If you’re recording a full drum kit, you’ll need more.
Budget Recommendations
Entry-level (under $60): The Behringer U-Phoria UM2 or M-Audio M-Track Solo get you started with reliable basics. Sound quality is decent, though you’ll notice improvements if you upgrade later.
Best value (under $150): The Focusrite Scarlett Solo remains a popular choice for good reason—solid preamps, reliable drivers, and the included software bundle adds real value. The Universal Audio Volt 1 offers vintage-style coloration if you prefer a warmer sound character.
Future-proof (under $200): The MOTU M2 offers excellent converters and metering at this price point. The preamps sound clean and detailed, and the build quality suggests it’ll last years.
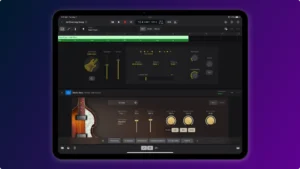
Don't Buy Software Yet: The Hidden Value in the Box
Here’s something that surprises many beginners: that $150 interface you’re considering often includes $300+ worth of recording software. Before you budget for a separate DAW purchase, check what’s in the box.
The software bundles are real. Focusrite interfaces include Ableton Live Lite, Pro Tools First, and a collection of plugins. PreSonus interfaces include Studio One Artist—a fully functional DAW, not a stripped demo. Universal Audio Volt interfaces come with their Spark plugin collection. These aren’t 30-day trials. They’re yours to keep.
The plugins matter too. Beyond the DAW, most manufacturers include instrument plugins, effects, and sample packs. Focusrite’s “Hitmaker Expansion” and similar bundles contain compressors, EQs, and virtual instruments used on actual commercial releases. For a beginner building a home studio, this software would cost hundreds if purchased separately.
Register immediately. The serial number on your interface box or registration card is your key to everything. Create an account on the manufacturer’s website (Focusrite, PreSonus, Universal Audio, etc.) and register your hardware within the first few days. Some software offers expire, and you don’t want to miss the window.
My recommendation: Start with the included DAW. Learn it. Ableton Live Lite, GarageBand, or Studio One Artist will do everything a beginner needs. If you outgrow it after a year of serious work, you’ll know exactly what features you actually need in an upgrade. Most people never need more than what’s included free.
Consider Your Use Case
Recording music? Prioritize preamp quality and low-latency performance.
Podcasting? A single XLR input might suffice—check out dedicated options in my audio interface for podcasting guide.
Streaming? Look for interfaces with direct monitoring and consider loopback features, which let you route computer audio back through the interface. My audio interface for streaming guide covers this in detail.
The Bottom Line
You don’t need to spend a fortune to get good results. A $100-150 interface from a reputable manufacturer will serve most home recording needs effectively. The differences between mid-range and high-end interfaces are real, but they become less important relative to your room acoustics, microphone choice, and performance quality.
Invest in learning your equipment well. A $100 interface in the hands of someone who understands gain staging, direct monitoring, and proper driver settings will produce better recordings than a $500 interface misused by someone who doesn’t.
Wrapping Up
An audio interface translates between your analog world of microphones and instruments and your computer’s digital world. It provides the preamps that amplify weak signals, the converters that digitize them, and the monitoring options that let you hear what you’re recording.
Understanding phantom power, direct monitoring, and latency settings transforms an audio interface from a confusing box into a tool you control confidently. And when problems arise—the one-sided recording, the crackling audio, the mysterious hum—you now have the knowledge to diagnose and fix them.
If you’re ready to explore specific options, my Best Budget Audio Interface roundup compares tested recommendations across different price points and use cases.
FAQ
Do I need an audio interface if I have a USB microphone?
Not necessarily. A USB microphone has a basic audio interface built in—it handles the analog-to-digital conversion internally. For simple podcasting, video calls, or casual voice recording, a USB mic works fine.
However, you’ll want a dedicated audio interface if you plan to record instruments, use multiple microphones simultaneously, or upgrade to professional XLR microphones later. An interface also gives you better preamps, lower latency, and more flexibility to grow your setup over time.
What's the difference between an audio interface and a mixer?
An audio interface converts analog audio to digital and sends it to your computer for recording. A mixer combines multiple audio sources and adjusts their levels, but traditional mixers don’t connect to computers at all.
Some modern devices combine both functions—USB mixers include an audio interface built in. For home recording where you’re tracking one or two sources at a time, a simple audio interface is usually more practical and cost-effective than a mixer. Mixers become useful when you need to blend many sources live, like for podcasts with multiple guests or live streaming setups.
Can I use an audio interface with GarageBand or free recording software?
Yes. Audio interfaces work with virtually any recording software (DAW), including free options like GarageBand, Audacity, and the lite versions of professional DAWs that come bundled with many interfaces. The interface handles the audio input and output; the software handles recording, editing, and mixing.
In fact, most beginners should start with free software. GarageBand on Mac or the bundled DAW that comes with your interface (like Ableton Live Lite with Focusrite, or Studio One Artist with PreSonus) provides everything you need to learn recording fundamentals.
Why does my recording have a delay when I monitor through headphones?
That delay is called latency—the time it takes for your audio to travel into the interface, through your computer, and back out to your headphones. It happens because digital audio processing isn’t instantaneous.
The solution is direct monitoring, a feature on most audio interfaces that routes your input signal straight to the headphones before it reaches the computer. This gives you zero-latency monitoring while still recording normally. Look for a “direct monitor” or “monitor mix” switch or knob on your interface.
How many inputs do I actually need on an audio interface?
For most home recording situations, two inputs are enough. This covers recording vocals with a microphone, guitar or bass direct, a stereo keyboard, or two sources simultaneously (like acoustic guitar and vocals together).
You only need more inputs if you’re recording multiple sources at the same time—like a full drum kit (8+ mics), a band playing live together, or a podcast with several guests on separate microphones. Don’t overbuy inputs you won’t use; that money is better spent on a higher-quality two-input interface or a better microphone.
| Why Can You Trust Us

Bruno Bontempo
I've been recording, producing, and playing bass for over 20 years—from touring with my first band at 15 to playing progressive metal across Europe today. Through multiple albums, projects (Madness of Light, Rising Course, Roots of Ascendant, Human|Archive), and production work, I've tested audio interfaces in every scenario imaginable. At Best Audio Hub, I combine my historian background with years of hands-on music and audio experience. No marketing fluff—just honest insights from someone who's been in the trenches.
| ALSO REVIEWED